Manage POI Forms in greytHR: Reject, Lock, and Delete
Updated in February - 2026 | Subscribe to watch greytHR how-to video
Proof of Investment (POI) is a process where the employees provide documents to validate their investment claims, enabling them to qualify for tax benefits as per their country's income tax laws during the tax filing process.
After releasing the POI declaration form to the employees, the employees submit them along with their proof documents. The next step is to reject, lock, or even delete the POI forms as per your requirements. The greytHR Admin portal POI Overview page allows you to perform these actions under the Yet to be released tab and Released tab in the following ways:
View POI form for individual employees.
Reject and lock POI form.
Change auto-lock due date.
Delete POI form (optional).
Under the Released tab you can filter the employee based on the employment status, i.e., Active and Resigned. Select Active to view the current employees. Select Resigned to view the separated employees and employees serving notice periods for the current financial year.
To view the POI Overview page, from the greytHR Admin portal, hover over the 9 dots and go to Payroll > Admin > POI Overview.
Reject and lock POI form
This option allows you to reject and lock the POI declaration form for selected employee(s). To reject POI forms for the selected employee(s), from the greytHR Admin portal, hover over the 9 dots and go to Payroll > Admin > POI Overview.
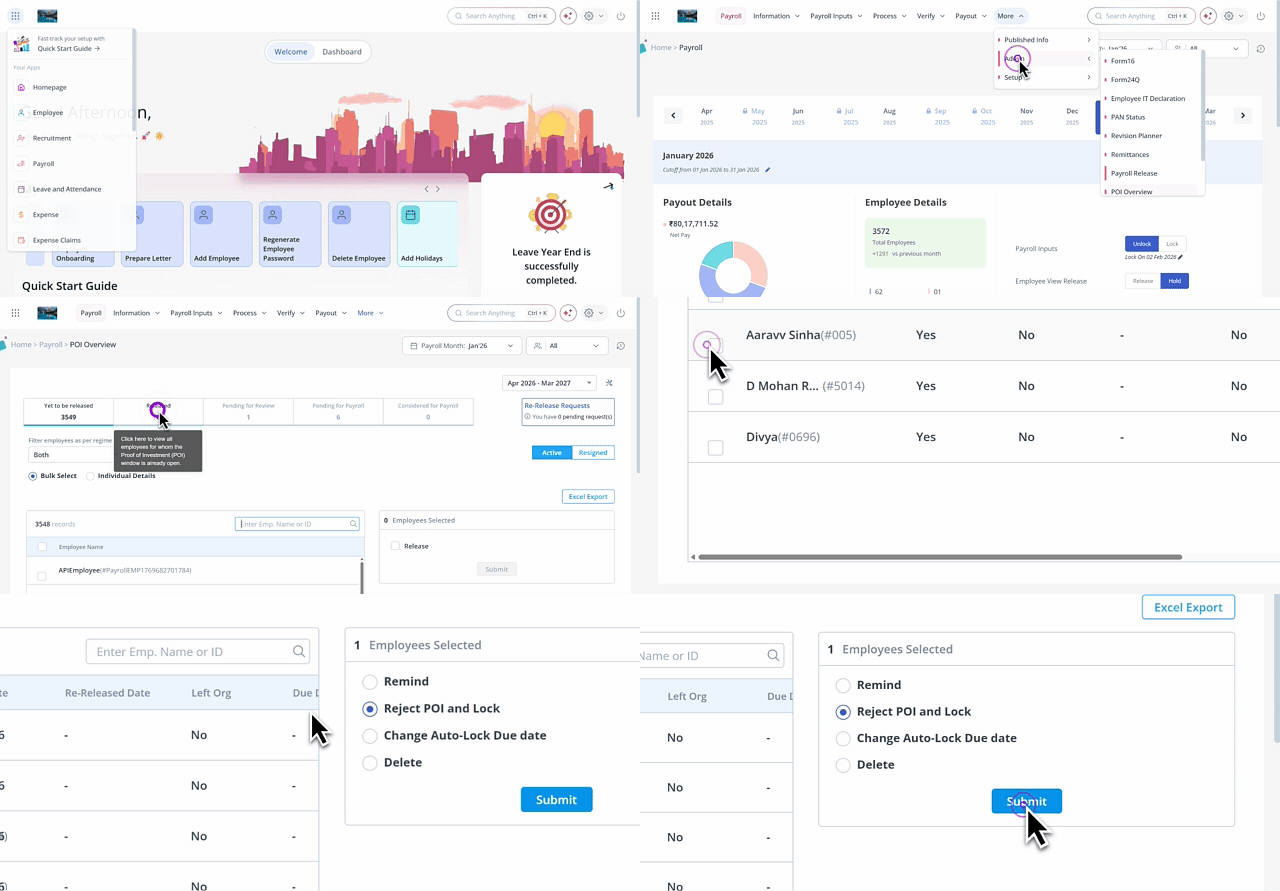
On the POI Overview page, under the Released tab, from the Filter employees as per regime list, select a regime as per your requirements.
Select the Active/Resigned option.
Select the Bulk Select option.
Select the employees from the list using the checkbox.
On the right side of the screen, under the Employees Selected list, select the Reject POI and Lock option.
Click Submit. The Reject POI and Lock pop-up appears.
Select all the checkboxes that inform you about the after-effects of rejecting a POI form. Note: This is a mandatory step.
Click Confirm to reject and lock the POI. The form moves to the Pending for Review tab.
Change auto-lock due date
This option allows you to edit the Auto-Lock Due Date for the selected employee(s). To change the auto-lock due date, from the greytHR Admin portal, hover over the 9 dots and go to Payroll > Admin > POI Overview.
On the POI Overview page, under the Released tab, from the Filter employees as per regime list, select a regime as per your requirements.
Select the Active option.
Select the Bulk Select option.
Select the employees from the list using the checkbox.
On the right side of the screen, under the Employees Selected list, select the Change Auto lock Due Date option.
Click Submit. The Change Auto lock Due Date pop-up appears.
From the Due Date dropdown calendar, select the auto-lock due date.
Note: This is a mandatory step.Click Confirm to change the Auto-lock Due Date.
Delete POI form
This option lets you delete the POI declared by an individual or multiple employees. Kindly note that this option is available based on user requests. To delete POI, from the greytHR Admin portal, hover over the 9 dots and go to Payroll > Admin > POI Overview.
On the POI Overview page, under the Released tab, from the Filter employees as per regime list, select a regime as per your requirements.
Select the Active/Resigned option.
Select the Bulk Select option.
Select the employees from the list using the checkbox.
On the right side of the screen, under the Employees Selected list, select the Delete option.
Click Submit. Delete pop-up appears.
Select all the checkboxes that inform you about the after-effects of deleting a POI form. Note: This is a mandatory step.
Click Delete to delete the POI and move it to the Yet to be released tab.
View POI form of individual employees
You can view the POI form saved by an employee under the Released tab too. There are two tabs available for Individual employees: View Form and Information. To view POI for an individual employee, from the greytHR Admin portal, hover over the 9 dots and go to Payroll > Admin > POI Overview.
On the POI Overview page, under the Released tab, from the Filter employees as per regime list, select a regime as per your requirements.
Select the Individual Details option.
From the Enter Emp. Name or ID search box, search for the employee for whom you want to view the POI. You can also select the employee by clicking the employee name displayed under the Employee Name list.


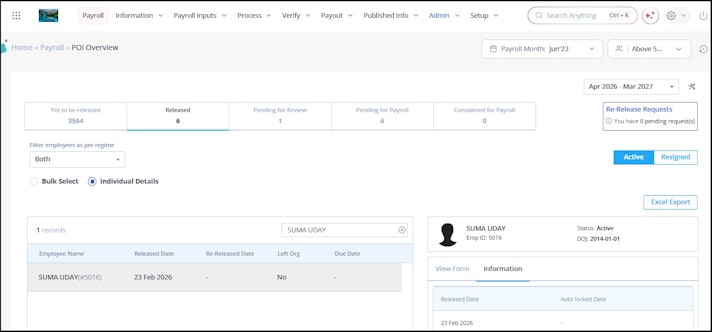
On the right side of the screen, under the View Form tab, you can view a summary of the form. To view the form in detail, click View Form. The page redirects to the Overview tab of the Review POI page. This page displays the items that the employee has saved but not declared.
Note: Admin cannot edit the employee's POI form under the Released tab.
You can also view Additional Details such as the Released Date and Auto locked Date under the Information tab on the POI Overview page.
After performing these actions, the next step is to either re-release or consider the POI submissions of your employees.
Related articles: