Efficiently Review Expense Requests in greytHR
Updated in June- 2026 | Subscribe to watch greytHR how-to video
Reviewing expense requests is crucial to ensure that all requests comply with company policies, are supported by valid documentation, and fall within approved budgets. It helps maintain financial accuracy, prevent misuse, and streamline timely reimbursements for employees.
Managing expense requests with greytHR is easy. As an admin, you can effortlessly track and review all expense requests, whether pending or closed, directly from your greytHR Admin portal.
To manage expense requests effectively, you must first ensure that the correct user roles and permissions are enabled.
To configure access for managing expense requests, from the greytHR Admin portal, go to Settings > User Administration > Users > User Roles.
Select the admin user role card and click the Edit icon.
From the Category dropdown list, select Expense Management. The table displays all the related features.
Enable the Read Access and Write Access checkboxes for features such as Expense Management, Expense Review, Expense Review - View Policy, Expense Review - View Rule, Expense Workflow, and Workflow Expense Admin.
Click Save.
To manage the expense requests of your employees, from your greytHR Admin portal, hover over the 9 dots and select Expense > Workflow.
The Workflow page in the Expense module allows you to:
Review the employee expenses
Monitor the employee expenses
Review employee expenses
As an admin, you need to review the expense requests before processing to ensure they comply with company policies and are supported by valid documentation.
To review an expense request, hover over the 9 dots and select Expense > Workflow > Review.
The Review section on the Workflow page has two tabs:
Pending: Displays the list of all the expense requests submitted by the employee that you need to review.
This includes the Employee Details, Expense Category, No. of Expense Items, Total Amount, and the submission date.
You can filter the data, add additional columns, and export or download the list as needed using the icons on the top right.


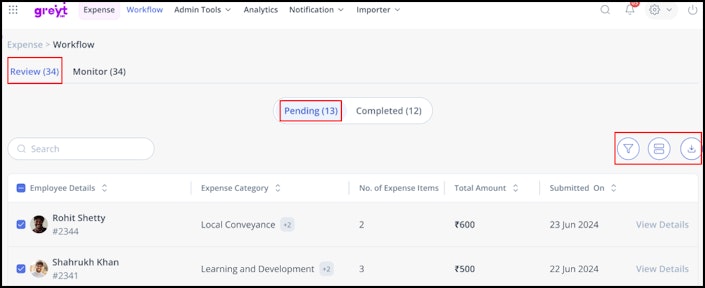
Completed: Lists the requests that have already been reviewed and processed.


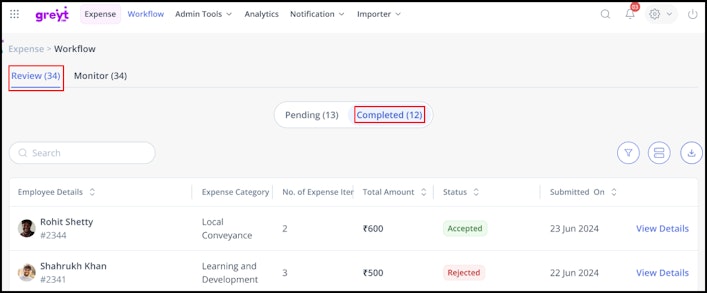
You can review a single or multiple expense requests at once, as per your requirement.
Review a single expense request
From the Pending tab, select the expense request that you want to review and click on the View Details button.
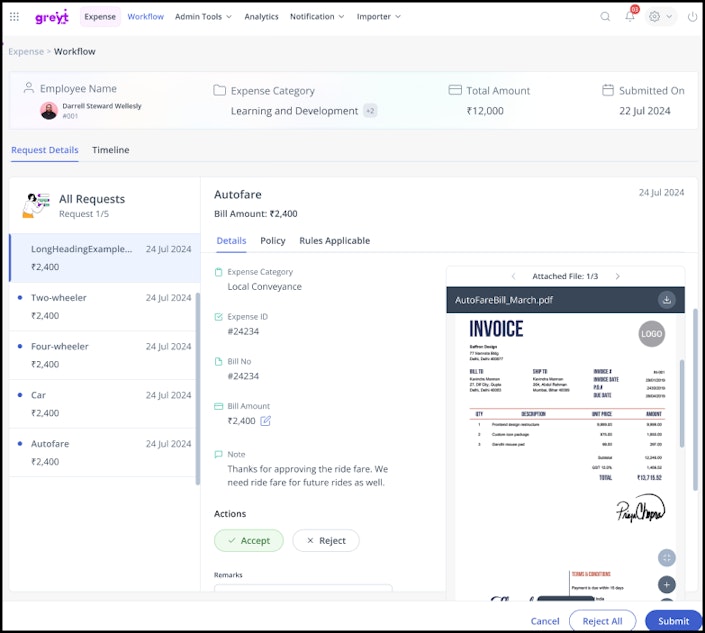
On top of the View Details screen, you will be able to see the Employee Name, Expense Category, Total Amount, and submission date.
Under the Request Details tab, on the left, you can view the individual expense items.
In the Details section, you can see the detailed information about the expense request, such as the Expense Category, Expense ID, Bill No., any notes from the employee, and attachments shared by the employee. The PDF Viewer helps you to zoom in and out of the attachments, preview the attachment without downloading it, view multiple attachments, and also download the attachments. You will also have the Actions options (Accept/Reject/Forward) as per the policy configurations and Remarks sections.
Under the Policy section, you can view the policy details applicable to each expense item.
Under the Rules Applicable section, you can see what the rules apply to each expense item.
Under the Timeline tab, you can view the actions taken and the status with respect to each expense item.
Once reviewed, click the required action option (Accept/Reject/Forward) as per the policy configuration for each expense item and click Submit.
Note: If you reject the expense item, it is mandatory to add the remarks.A Request Summary pop-up will appear, displaying the actions taken for each expense item. Enter the remarks if needed, and click Confirm to complete the review process.


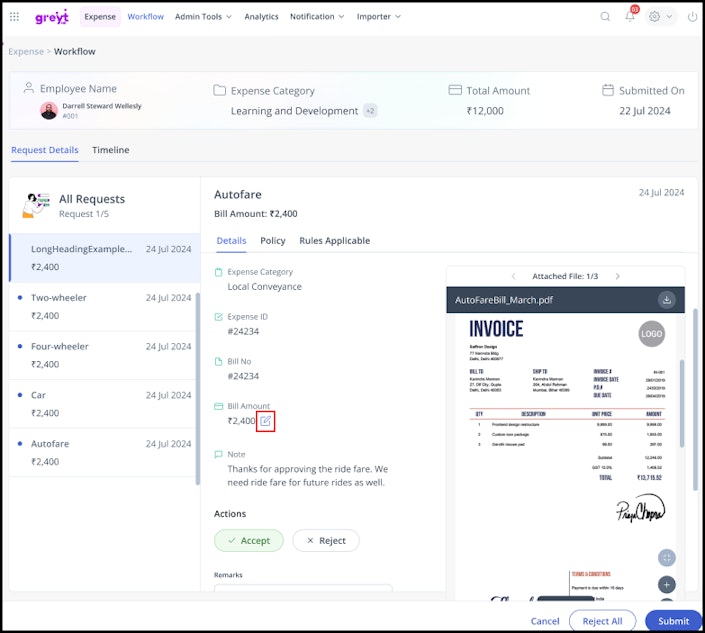
Note: If you need to override the bill amount or price per kilometer, click on the Edit icon next to the respective option. Enter the Override Amount/Override Price per Kilometer, remarks for overriding, and click Save. The updated Overridden Amount/Updated Bill Amount would appear accordingly.
Review multiple expense requests
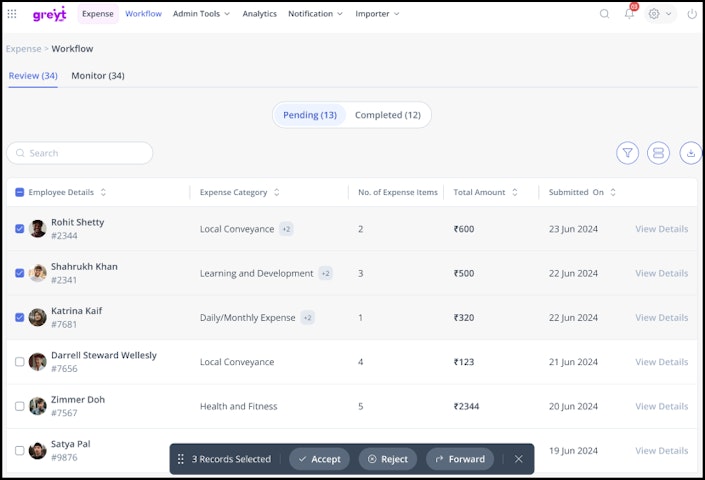
To review multiple expense requests, from the Pending tab, select the required requests using the checkboxes.
Select the required action as Accept/Reject/Forward as per the policy configuration.
A pop-up window appears, enter the Remarks, and click Confirm.
Note: If you reject the expense request, it is mandatory to add the remarks.


Monitor employee expenses
You can monitor an expense request submitted by the employees and take actions on it, such as Accept/Reject/Forward, as per the requirement.
To monitor an expense request, hover over the 9 dots and select Expense > Workflow > Monitor.
From the Pending tab, select the required request and click View Details.
Select the required action as Accept/Reject/Forward as per the policy configuration and click Submit.
A pop-up window appears, enter the Remarks, and click Confirm.
Note: If you reject the expense request, it is mandatory to add the remarks.
Export expense requests as PDF
For audit and record-keeping purposes, expense requests can be exported as PDF along with all attached bills and supporting documents.
Export expense requests in bulk
Admins can export multiple expense requests at once from the Workflow page.
From the greytHR Admin portal, hover over the 9 dots and go to Expense > Workflow > Review.
Select the Pending or Completed tab.
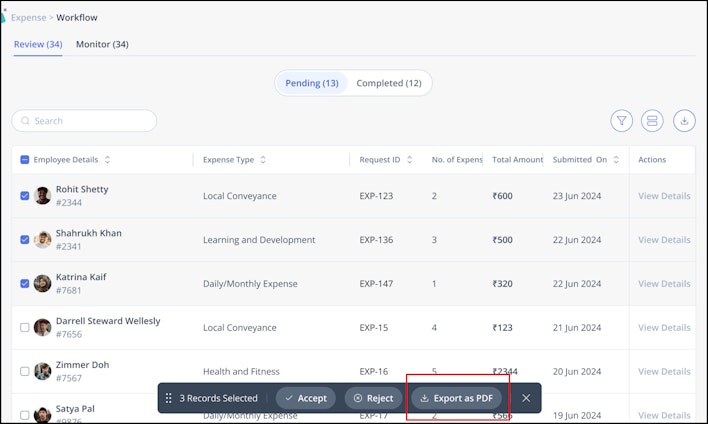
Select one or more expense requests using the checkboxes. A floating banner appears with the Export as PDF option.
Click Export as PDF. A ZIP file is downloaded containing one folder per expense request, named with the Expense ID and Request ID.
Each folder contains:
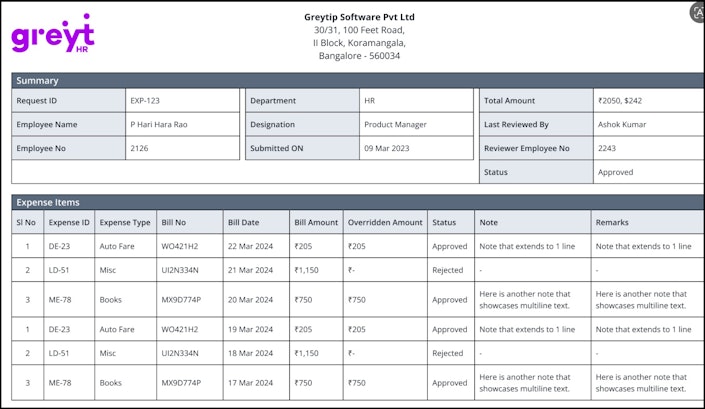
A summary sheet with the key details of the expense request.
All attachments uploaded by the employee for that request.


Export single expense request
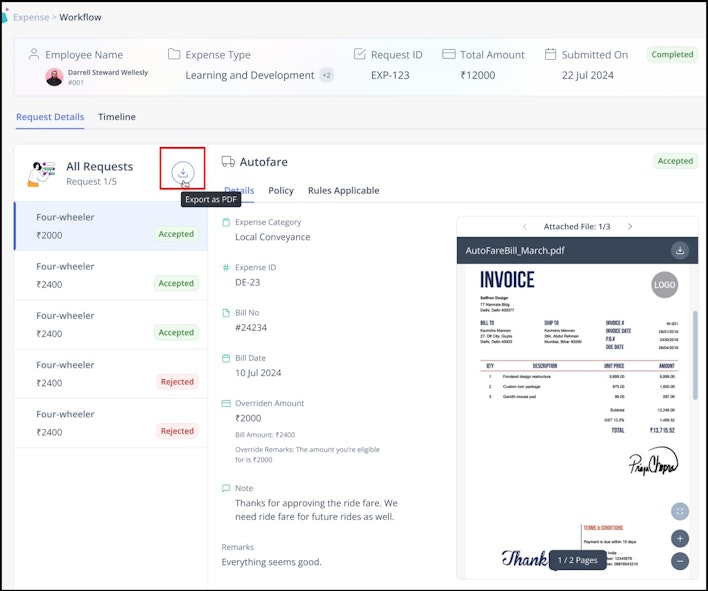
Admins can export a single expense request from its detail page.
Open the required expense request.
Click the Download button (hovering shows Export as PDF).
A ZIP file named [Request ID].zip (for example, EXP-23.zip) is downloaded.


For a single request, the ZIP has a flat structure — the Summary Sheet PDF and all attachments sit at the root, with no subfolders.
The Summary Sheet PDF includes a header section and an expense details table. The fields vary based on whether the request is in the Pending or Completed tab, and whether it is being exported by the admin or the employee.


Related articles: