Add a Job in greytHR Recruit: A Step-by-Step Guide
Updated in November - 2025 | Subscribe to watch greytHR how-to video
Jobs in greytHR Recruit helps HR admins and hiring managers streamline recruitment by attracting qualified candidates through job listings. The greytHR Recruit platform enables recruiters to create and manage job posts effectively, aiding in resume submissions, job matching, and tracking applications.
On the Jobs page, recruiters can:
Manage all job listings and activities.
Apply filters for Active jobs, On Hold, Closed, Unapproved, Rejected, and Archived.
Refine search results using filters like Assigned To, Date added, Job Type, Agencies, Hiring Events, Confidential Jobs, Internal Jobs, Referral Jobs, Job Level, Job Category, Location, Hiring Type, Recruiter, and Hiring Manager.
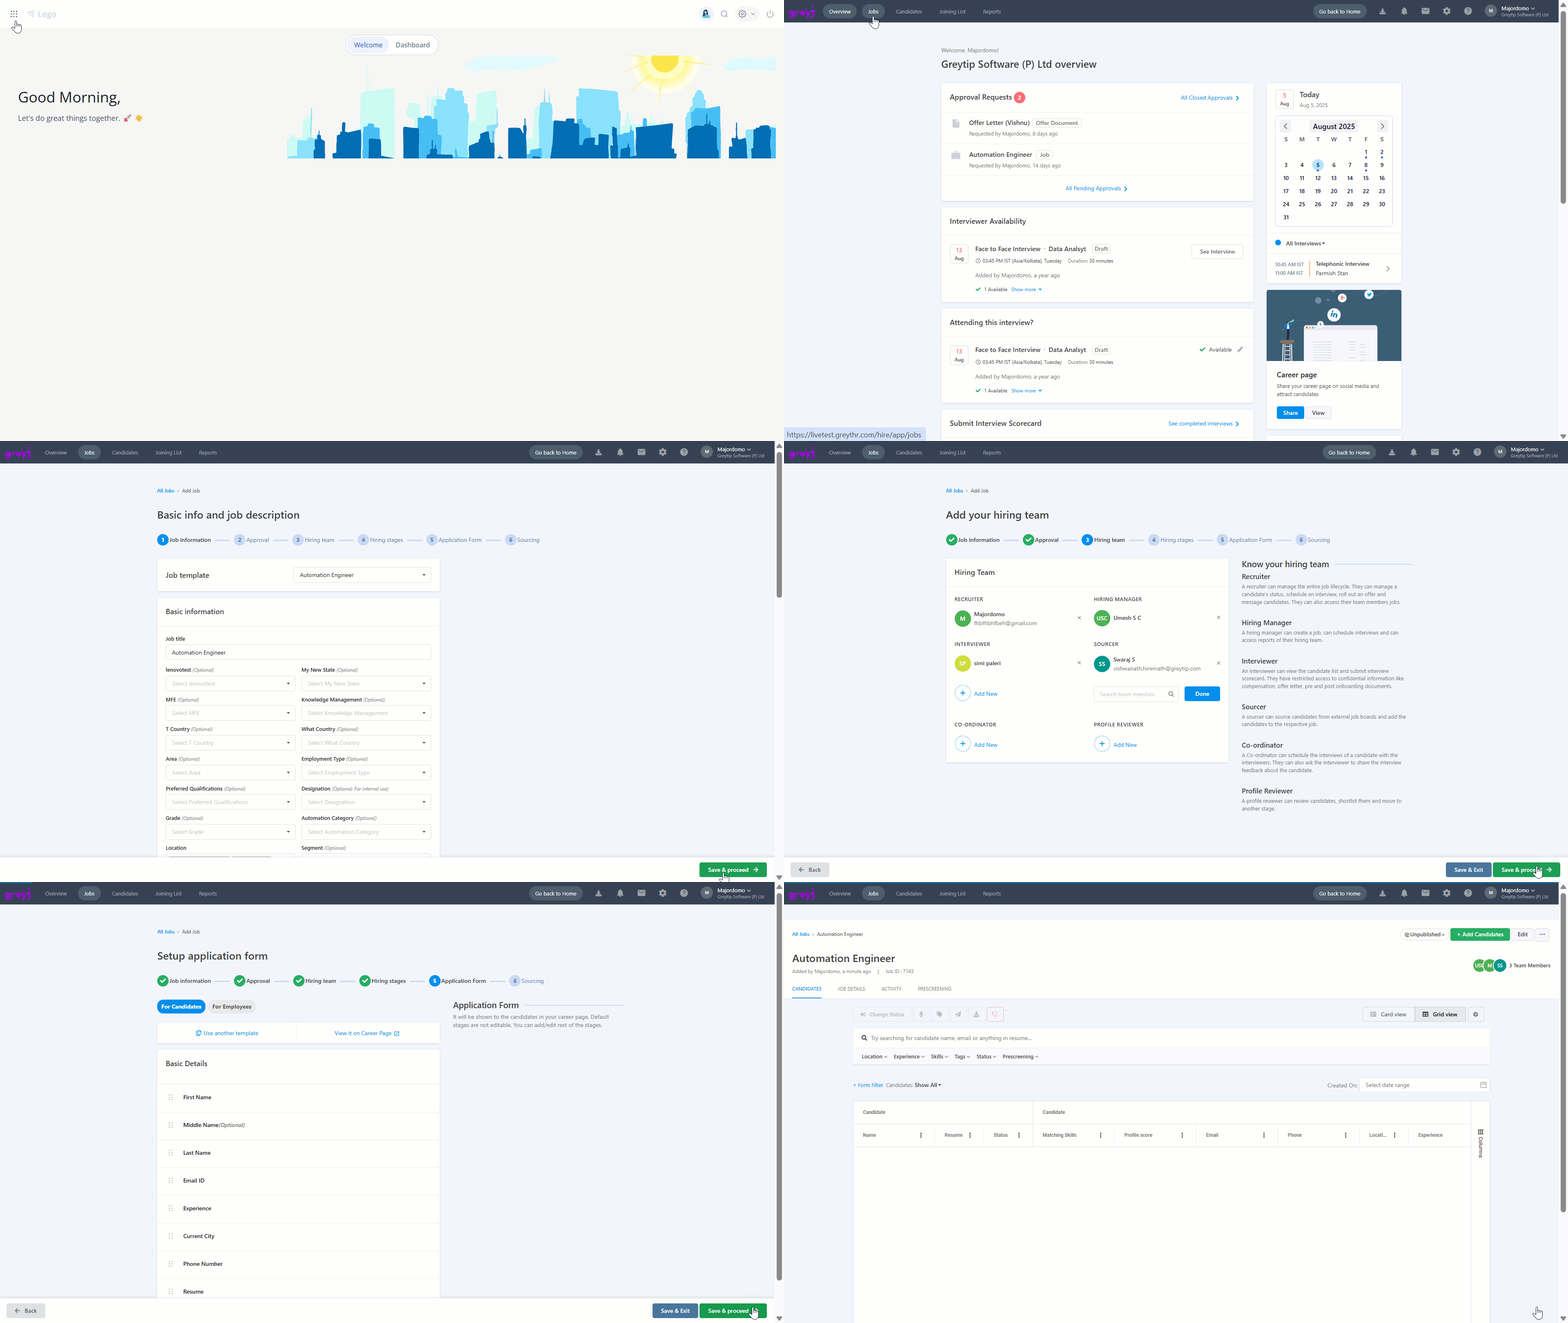
Steps to add a job
Adding a job involves the following six steps:
Job Info
Enter details about the job, including Job Title, Job Type, and Location.Approval
Set up an approval chain if necessary. Toggle Request for Approval to Yes and choose approvers.Hiring Team
Assign roles to team members (For example: Recruiter, Hiring Manager, Sourcer, Coordinator, Profile Reviewer).Hiring Stages
Define and customize the stages of hiring, such as Application Review, Screening, Interview, and Offer as per your requirements.Application Form
Set up the application form that applicants will fill out on the Career page. Customize questions/fields if needed.Sourcing
Enable applicant inflow from sources such as the Career Page, Hiring Events, or Agency Sourcing.
Methods to add a job
You can add a job in two ways:
Manual Entry: Enter all job details manually.
Using a Template: Select an existing job template to auto-fill information.
Note: Users can copy details from the Job Info section of a previously created job instead of manually entering them. To do this, select the job position from which you want to copy the information. Once the job is selected, all fields auto-populate with information from the previously selected job.
Step-by-step guide to manually add a job
1. Navigate to the Jobs section
From the greytHR Admin portal, hover over the 9 dots and select Recruitment > Jobs.
2. Create a new job
On the Jobs page, click + Add Job.
3. Fill in basic information
Job Title: Choose the job title.
Job Category/Function: Choose or create the functional area.
Job Type: Select type (Example: Full-time, Internship).
Job Level: Optional internal level.
Hiring Type: Select type (Example: Lateral, Campus).
Job Location: Add job location(s). Define office locations under Settings > Company Profile.
Number of Openings: (Optional) Enter the number of vacancies.
Mark as Confidential: Check to keep job details private.
4. Complete Job Description
Use formatting tools to enter detailed job specifications.
CTC Details: From the Select Currency dropdown, select the currency as per the geo-location, provide the minimum to maximum CTC range, and the CTC frequency as Monthly or Yearly.
Note: As an admin, you can enable the currency type as per the job location. To do so, from the Recruit portal, go to Settings > COMPANY > Currencies. Enable the currency by toggling the option against each currency code.
5. Define experience and skills
Experience Level: Set minimum and maximum required experience.
Important Skills: Select required skills. You can add or remove skills to refine the criteria.
6. Add additional details
Custom fields configured under Settings > Job Setup > Custom Job Fields are available here.
7. Copy details from an existing job (Optional)
To duplicate job details from an existing position, select the job position to auto-populate fields.
8. Save and proceed to approval
Click Save & Proceed.
9. Set up job approval (If required)
Toggle Request for approval to Yes.
Reviewers: Select reviewers or add multiple reviewers.
Notes: Add notes for reviewers.
Attachments: Attach files if needed.
Note: Before setting up the approval process, go to Settings > Preferences and enable the Allow reviewers to see previous reviewer comments option. This ensures reviewers can view earlier feedback, helping them make better decisions, avoid repeated checks, and maintain transparency.
10. Define hiring team
Assign roles: RECRUITER, HIRING MANAGER, and INTERVIEWER.
Reference team roles in Know your hiring team for clarity.
Note: Multiple roles cannot be assigned to one user.
11. Set up hiring stages
Default stages (Example: Application Review, Offer) are fixed.
Screening: Toggle Automated Prescreening on/off as needed.
Add custom stages for tests and interviews.
12. Add interviews and scorecard
Interviews: Add various interview stages.
Scorecard: Set competencies for scoring candidates. Customize under Admin settings.
13. Customize the application form
Select Use another template or View on Career Page.
Note: The default form is set at the company level; additional questions can be added.
14. Publish job and attract candidates
Publish: Post the job on the Career page.
Agency Sourcing: Enable and assign agencies for candidate referrals. Set an expiry date if needed.
Hiring Events: Toggle on to publish as a hiring event.
Job Boards: Select the Location, Industry, and Salary options to publish the jobs on Naukri, Hirist.com, and IIM Jobs.
15. Finalize setup
Click Finish Setup.
Job management actions
Card View/Grid View: Toggle views to perform job actions.
Candidates Tab: View candidates added to the job.
Job Details Tab: Displays job information.
Activity Tab: View job activity timeline.
Prescreening Questions: Add new questions if needed.
Download JD: Download job descriptions directly from the three dots icon (next to the Edit icon) and under the Job Details tab.


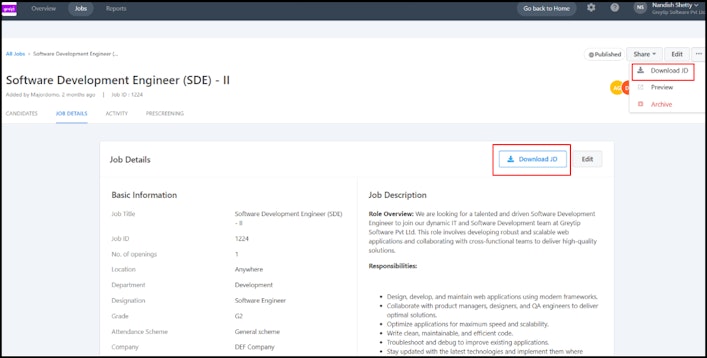
Job status and actions
Change job status (Example: Published, Unpublished) using the dropdown filter.
Add Candidates: Attach candidates from the system.
Edit: Modify job details.
Kebab Icon Options: Export to CSV, preview, or archive the job.
Publish a job
Following are the steps to publish a job:
From the greytHR Recruit portal, hover over the 9 dots and select Recruitment > Jobs .
Select the required job card and click the dropdown available on the card.
Select Published. Then choose Publish Now/Schedule for Later options as per your requirements.
Click Done.
Key features of the published job
This feature helps users publish the job to the Career page. The jobs listed on the Career page also appear in Google searches.
Publishing a job generates a unique URL for the job which can be shared on various social media channels such as Facebook, Twitter, LinkedIn, and Email.
Applicants can view the job posting and apply to it using the Apply Now button which opens up the Application Form set up for the same. The application is successfully submitted once the applicant fills up the mandatory fields on the application form.
The applications received through the job posting link are tagged to the job accordingly.
Configure an end date for a job
If your organization has multiple job openings, adding a due date makes it easier to track, filter, and close jobs on time. This feature helps you, as a recruiter, manage postings better and shortlist candidates before the job expires.
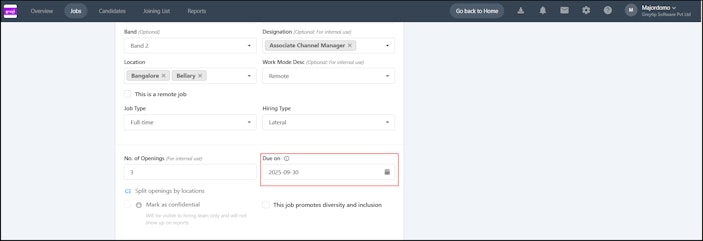
You can set the job's due date either while creating or editing the job. Go to the Job Information tab and select the date from the Due on field.
Note: Selecting a due date is not mandatory when creating or editing a job in greytHR Recruit.


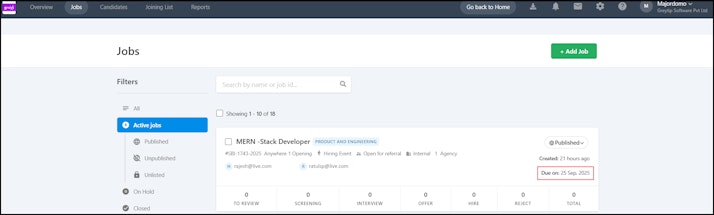
After the due date for the job is set, you will be able to view the due date on the job card.


Once a job’s due date has passed, you can either close it manually or let the system auto-close it based on your configuration.
To close a job manually, on the job card, select Closed from the dropdown menu.
To auto-close jobs, go to Settings > Preferences and enable Auto-close jobs when they reach their due date.
Note:
When a job is three days away from its closing date, a warning icon appears on the job card.
You can also enable email notifications to alert you when a job’s due date is approaching.
Go to Settings > COMPANY > Email Notifications, enable Job due date reminder, and set how many days in advance you want the notification via email.
You can also use the Due on filter on the Jobs page to view which jobs are nearing the expiry date.
Delete a job
The recruiters can delete outdated or incorrect job records directly from the Job Listing page. You can delete jobs in two ways:
Bulk deletion of jobs
From the Jobs page, select the checkbox to select multiple jobs listed in the page. The Delete button appears on the top right.
Click Delete and confirm.
Individual deletion of job
From the Jobs page, select the required job card and click the meatballs icon(...).
Select Delete job and confirm.
Note: Deleting a job will untag its candidates, but they will remain in the candidate pool. Their status in other jobs, if any, will stay unchanged.
Other related links: