Custom Fields for Expense Module in greytHR Guide
Updated in July - 2026 | Subscribe to watch greytHR how-to video
Every organisation has unique data requirements that go beyond what standard forms capture. Custom Fields is a platform-level feature in greytHR that allows admins to create and configure organisation-specific fields across modules — ensuring the right data is captured at the point of entry, without any engineering involvement.
Custom Fields are built around a central Field Library, where you as an admin can create, manage, and archive fields. Once created, fields can be configured within the relevant module's policy or workflow to control when they appear, who sees them, and whether they are mandatory.
To access the Field Library, from the greytHR Admin portal go to Settings > System Settings > Miscellaneous > Field Library.
The Field Library page opens with two sections: a left panel listing modules and a right panel displaying fields. Select the relevant module from the left panel. The fields are listed under two tabs — Fields in Expenses and Archived.
Create a custom field
Select the Fields in Expenses tab, and click + Custom Field.
In the slider that appears, configure the following:
Field Name— choose from Text, Drop Down, Radio Button, Check Box, Numeric, Date Picker (single date), or Date Range Picker.
Field Type— enter a clear, descriptive name for the field.
Help text
Placeholder Text — add guidance text to help users understand what to enter.
Validation — select Alphanumeric (Include Special Characters), Alphabetic, Numeric or Email as applicable.
Use the Preview section to see how the field will appear.
Click Save.
Once saved, click Go to Policies to proceed to configuration, or Finish to return to the Field Library.
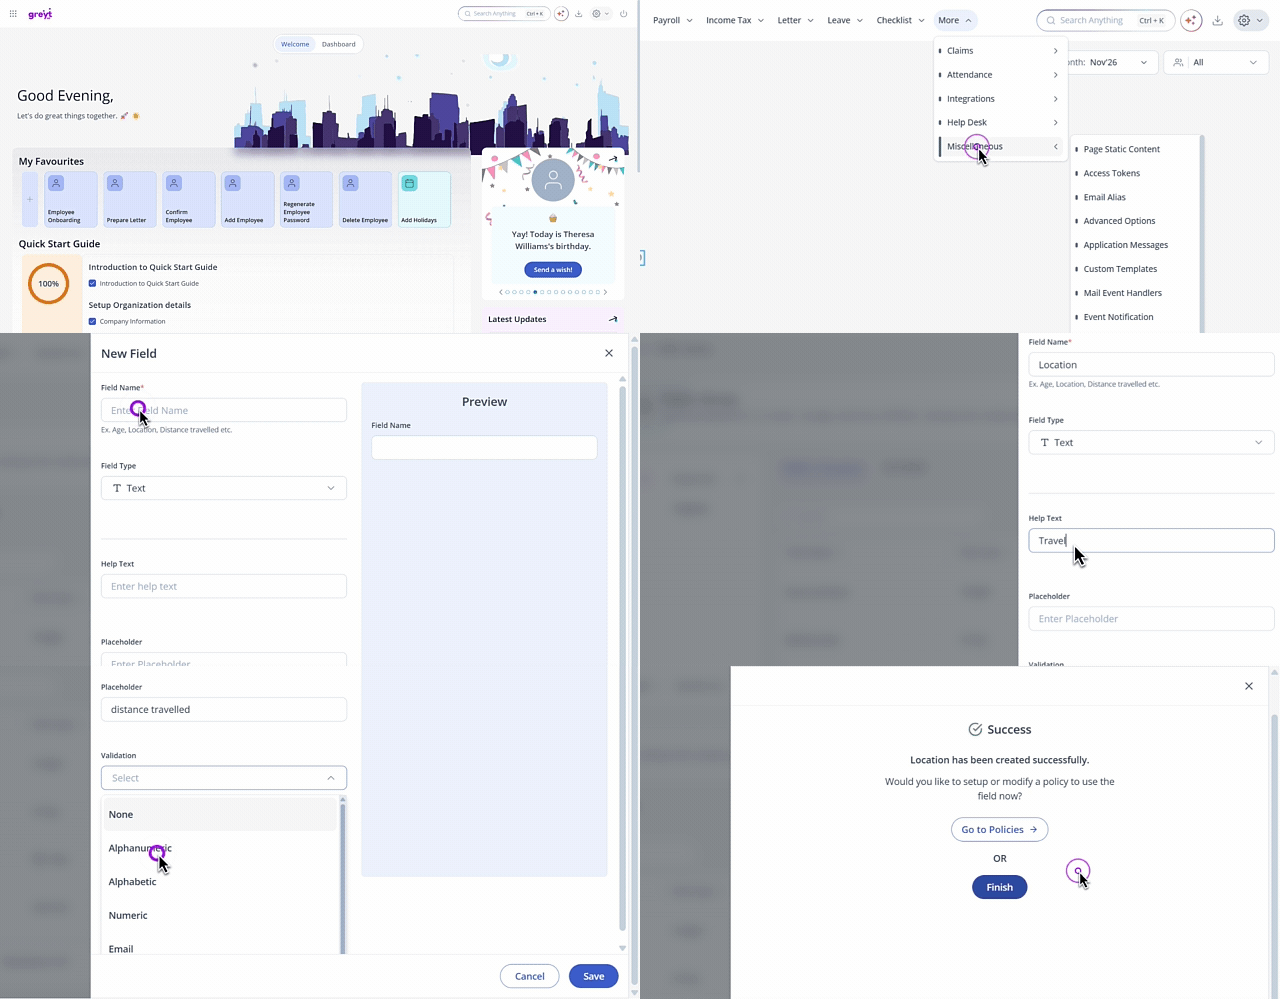
Note: Default system fields cannot be deleted. You can edit their placeholder text and validation settings.
Edit an existing field
In the Fields tab, locate the field.
Under Actions, click Edit Field.
Update the help text, placeholder text or field validation. Field type and field name are not editable after creation.
Save your changes.
Under Actions, click Show Field Usage next to any field. A panel displays all active and draft policies and the specific rules where the field has been added.
Archive a custom field
Under Actions, click Delete Field.
The field moves to the Archived tab. It is no longer available for new configurations, but its historical data is preserved.
Restore an archived field
Go to the Archived tab.
Note: Once a field is archived, admins cannot add it to any new configuration; however, existing configurations that use the field continue to work as is.Under Actions, click Restore.
The field moves back to the Fields tab and becomes available for use again.
Currently, Custom Fields are available for the Expense module. Support for additional modules will be added in upcoming releases.
Custom Fields in the Expense Module
With Custom Fields for Expense, you can create fields of different types, configure them within your expense policies, and ensure employees see exactly the right fields when they submit a claim — making expense data complete, structured, and consistent.
Configure custom fields in the Expense Policy Rule
Once custom fields are created in the Field Library, you can control their visibility and whether they are mandatory within each expense policy rule.
From the greytHR Admin portal hover over the 9 dots and go to Expense > Admin Tools > Settings > Policies.
Open the relevant policy (or create a new one).
In the Configure Rules section, navigate to the Then statement.
Click Custom fields: visibility and mandatory.
Under Custom fields to be shown, click Select Value and choose a custom field from the dropdown.
Set the field as Optional or Mandatory.
To add more fields, click Add another custom field and repeat. Proceed through the policy steps and save.
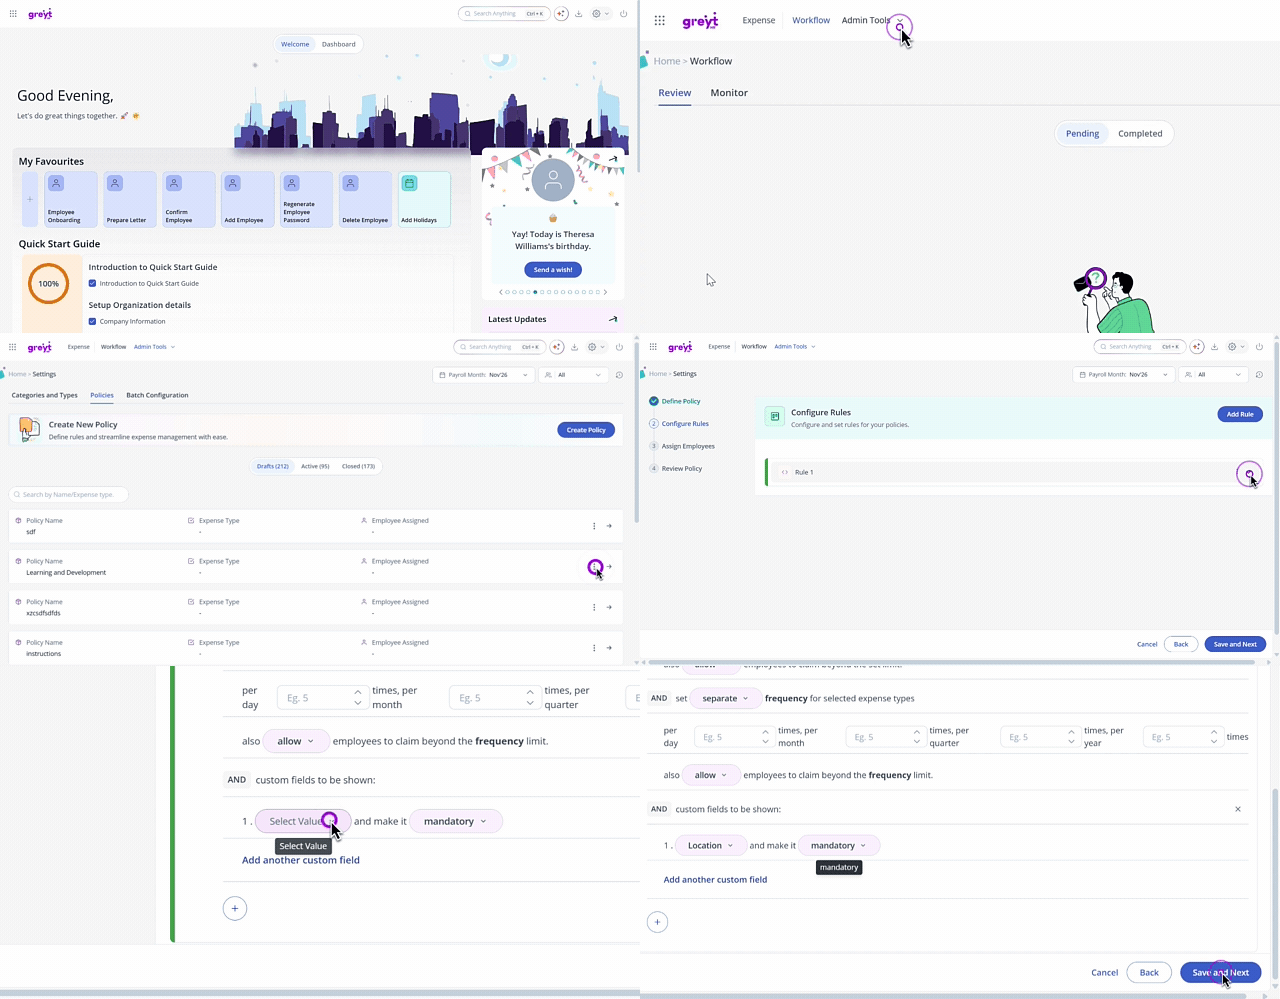
Note: Each custom field can only be added once within the same rule. If you add a duplicate, system displays an error and prevents saving until it is removed. Configured fields and their mandatory settings are visible in View Details for active and closed policies.
Important Notes
Custom fields appear just below the Notes field once the employee selects an Expense Type. If the Expense Type changes before submitting, the form refreshes accordingly.
Mandatory custom fields must be filled in before the employee can submit.
Submitted values are visible in read-only mode in the employee's Pending and History tabs, and in View Details on the Workflow page for admins and managers.
Custom fields are also available on the greytHR mobile app with the same rules and validations.
Related articles:
Categorize employee expenses