Learn How greytHR Recruit Simplifies Your Hiring Process
Updated in May - 2026 | Subscribe to watch greytHR how-to video
Recruiters often face challenges in efficiently managing the transition of candidates from offer acceptance to onboarding in the HRMS.
greytHR Recruit simplifies this process for the hiring manager or recruiter by enabling them to mark candidates as Hired on their joining day and automatically transfer their details to the company's database with the Add Hired Employee feature. This ensures a faster, automated, and seamless onboarding experience.
Key actions
Initiate the candidate's background verification.
Mark candidate status as hired.
Add hired employees from Recruit to the company database.
Sync employee documents
Sync offer letter salary structure with payroll
Initiate candidate's background verification
Once the candidate accepts the offer letter, the status automatically updates to Offer Accepted, and you can proceed with the background verification process by clicking on the Background Verification option.


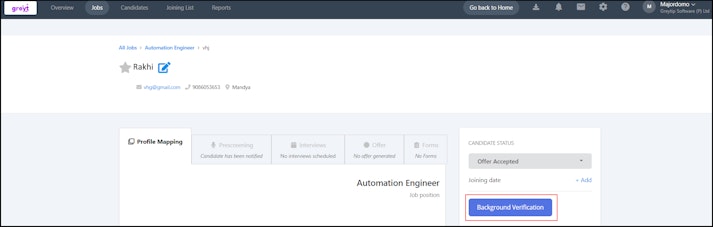
For an HR admin, background verification helps confirm employee details, reduce risks, and ensure a reliable hiring process. greytHR offers two background verification apps (SpringVerify and InstaVeritas) from the Unite Marketplace.
Info: If you are a first-time user, when redirected to Unite, you will be prompted to enter your email address and verify it using an OTP.
Note: The Background Verification option is available once the candidate has accepted the offer.
If one background verification app (SpringVerify or InstaVeritas) is enabled, clicking on the Background Verification option opens a pre-filled form with the following candidate details:
Candidate Name
Email
Phone Number
Selected BGV Package/Form (from vendor)
You can review or edit the pre-filled details before submitting. On submission, you are redirected to the vendor's dashboard where you can either upload candidate documents yourself or allow the vendor to collect them directly from the candidate.
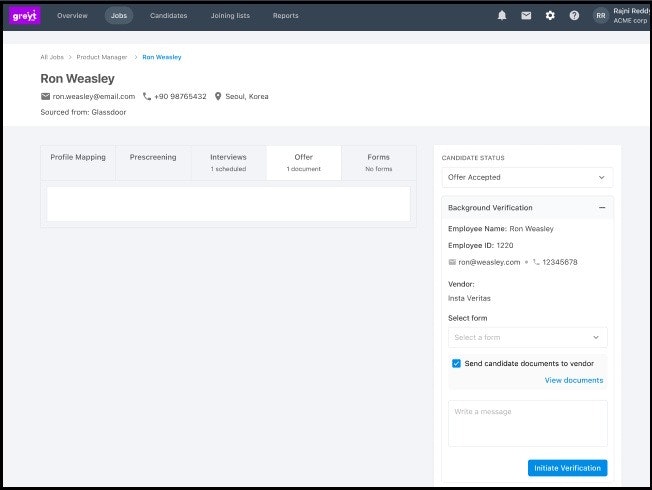
Note: Select the Send Documents checkbox during BGV initiation to automatically pass all available candidate documents from Recruit to the BGV vendor — eliminating the need to re-upload documents on the vendor dashboard.
If multiple background verification apps are enabled, clicking the Background Verification option displays a list of enabled vendors. Select the required vendor to proceed with the pre-filled BGV initiation form.
If no background verification app is enabled, clicking the Background Verification option redirects you to the Background Verification category page on Unite Marketplace, where you can explore and enable a vendor app.


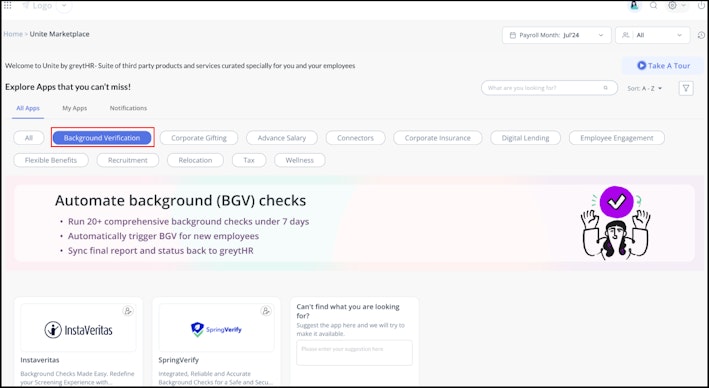
Info:
It is not mandatory to complete the background verification before marking the candidate as hired.
Candidate details are pre-filled during BGV initiation and passed to the enabled BGV vendor via the Unite API.
You can also automatically send available candidate documents to the vendor by selecting the Send candidates documents to vendor checkbox during initiation.
Click View documents to view all uploaded candidate documents directly within Recruit before sending them for verification.


Track BGV Status
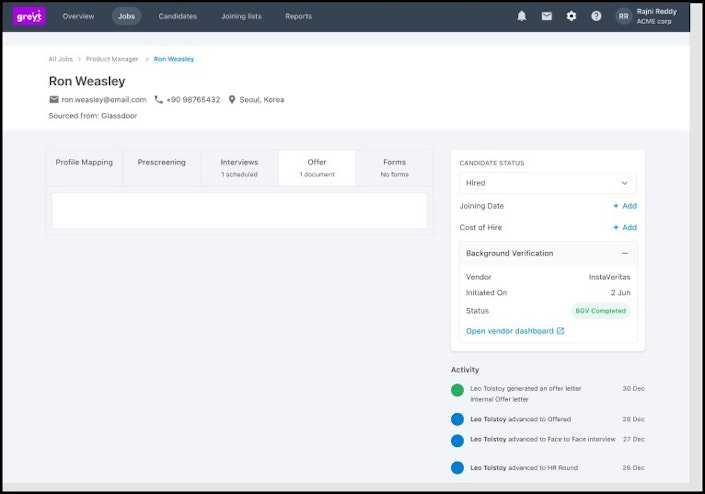
Once background verification is initiated, you can track its progress from greytHR Recruit. The status may appear as BGV Success, BGV Failed, BGV In Progress, BGV Paused. The BGV status is automatically updated in real time based on vendor responses.


Mark the candidate as hired
To mark the candidate’s status as hired, from your greytHR Admin portal, hover over the 9 dots, and select Recruitment > Candidates.
Select the candidate, click Jobs, and select the required job.
From the CANDIDATE STATUS dropdown, select the status as Hired. A pop-up screen appears.
If you want to keep the job posting open, click Okay, keep this job open.
If you want to close the job, click Great, Close the job, and select/add the appropriate reason.
Add the Joining Date for the candidate to appear on the Joining List page.
Note: You can click Add Employee to add the candidate to the company’s database.
Add hired employee from Recruit to the company database
The Joining List page displays candidates who have accepted offers and been marked as hired. Once the candidate's status is marked as Hired, the Add Employee option appears next to the candidate’s name, allowing you to add employees directly from Recruit.
To add an employee to Recruit, from your greytHR Admin portal, hover over the 9 dots, and select Recruitment > Joining List.


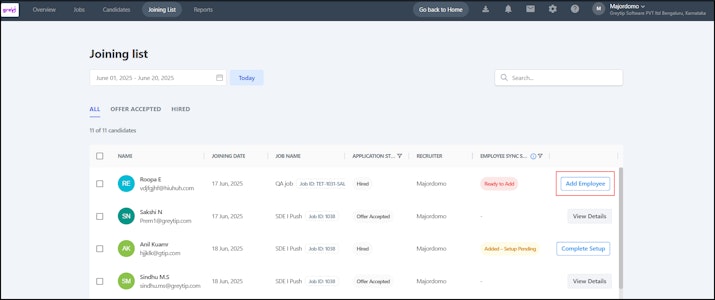
Select the date range to view the hired candidates.
Click Add Employee.
On the Add Employee form, fill in all the information.
Note: The fields displayed in the Additional Information are based on the configurations set in the active Employee Category settings.Once you have filled in all the required fields, click the Add Employee option, and the employee information will be added to the system.
Sync employee documents
After adding the employee, you can automate the synchronization of candidate documents from the recruitment process to the employee profile. This eliminates the need for manual re-uploading, reduces administrative effort, minimizes errors, and improves overall onboarding efficiency.
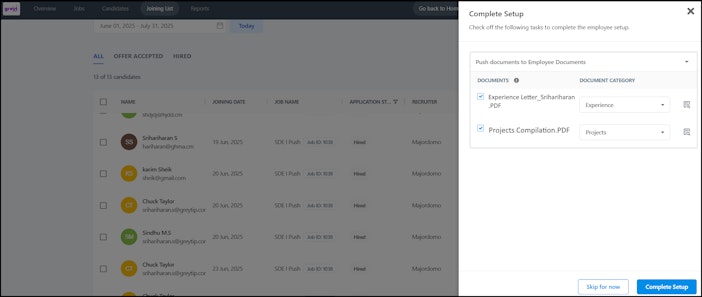
Once the employee is added, on the Joining List page, the Employee Sync Status changes to Added - Setup Pending, and the Complete Setup option appears next to the candidate’s name, allowing you to transfer the employee documents from Recruit to the Employee module.
Click on the Complete Setup option, and the window appears displaying all the documents available in the candidate's profile, along with a Document Category dropdown for easy selection, and a Preview option for each document.
Note: Alternatively, you can proceed with syncing the documents as the next step after the employee is added.As an admin, you must:
Select or deselect individual documents using checkboxes.
Map each document to a specific category. This is a mandatory step.
Preview any document by clicking the preview icon.
Once done, select Complete Setup to successfully push the selected documents to the Employee module.
Note: You can choose to select the Skip for now option to complete the setup later.


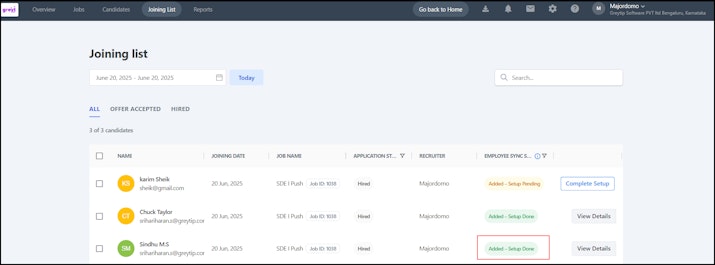
The Employee Sync Status changes to Added - Setup Done.


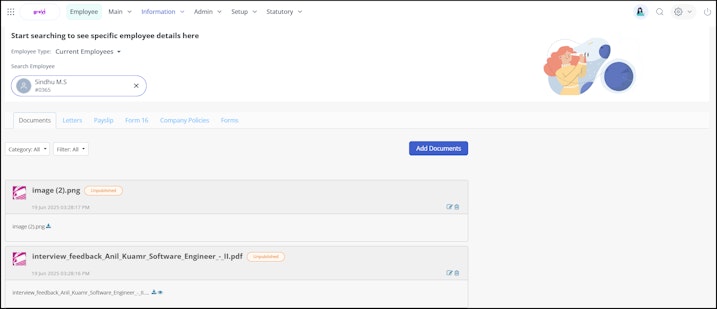
When the employee is added, their documents are automatically pushed to the HRMS. You can view these documents under Employee > Information > Employee Documents.


Sync offer letter salary structure with payroll
After syncing documents, you can also sync the candidate's salary structure directly to greytHR Payroll. The Complete Setup window displays two checklist items — Push documents to Employee Documents and Sync salary details to Payroll — which can be completed in any order.
To sync the candidate's salary to greytHR Payroll, from the greytHR Admin portal, hover over the 9 dots and select Recruitment > Joining List.
Open the candidate's profile click Complete Setup and expand the Sync salary details to Payroll section.
Review the salary details pre-populated from the candidate's accepted offer letter.
Expand Salary Input Fields to view offer-level input fields (read-only) and Salary Calculations to view all salary components.
Update the Effective Date and Payout Date if required. Both default to the Add Employee date.
Click Sync to Payroll to push the salary structure to greytHR Payroll.
Once done, the checklist item is marked as Done. When both items are marked Done, a "Setup completed successfully" confirmation appears.
To exit without syncing, click Skip for now.
Note: The Sync to Payroll button is the only action that triggers the sync. Expanding accordions or editing dates without clicking this button does not initiate any sync.
Select offer letter for salary sync
If the candidate has a single accepted offer letter, it is automatically resolved. If there are multiple, the system picks the latest based on acceptance date. To change it, click the Select Offer dropdown, choose the required offer letter, and click Sync to Payroll.
Note: Only accepted offer letters appear in the dropdown. Rejected offer letters are excluded.
Important notes:
The Push documents to Employee Documents and Sync salary details to Payroll actions are independent — no mandatory order between them.
The sync pushes all salary components, offer-level input fields, effective date, and payout date to Payroll. Components are mapped using Payroll component IDs.
Completing Sync to Payroll is not mandatory before marking a candidate as hired.
Related article: