Manage Letters, Forms, and Documents in greytHR Recruit
Updated in May - 2026 | Subscribe to watch greytHR how-to video
Documents are official records used for communication, verification, and record-keeping. They are crucial for ensuring transparency, legal compliance, and efficient information management within an organization.
greytHR Recruit offers a platform to efficiently manage document workflows by generating offer documents and forms, obtaining necessary approvals, sending documents to candidates, and receiving counter-signed documents from them.
As an HR admin, you can manage candidate offer letters through greytHR Recruit from generation and approval to sending, eliminating the need for emails. You can also create and customize templates with placeholders, making certain fields and approvals, like medical certificates, compulsory or optional.


You can perform the following actions:
Create an offer document for candidates.
Create a custom reference number for offer letters.
Send forms to candidates.
Create an offer document
You can create an offer document only for the candidates whose status is changed to Offered.
To change the candidate’s status to Offered, on your greytHR Admin portal, hover over the 9 dots and select Recruitment.
On the greytHR Recruit portal, go to the Candidates tab > select a candidate > on the right-hand side of the page, select the Jobs tab > click → available on the job card. You can also navigate to the Jobs tab > Candidates > click the required job card.
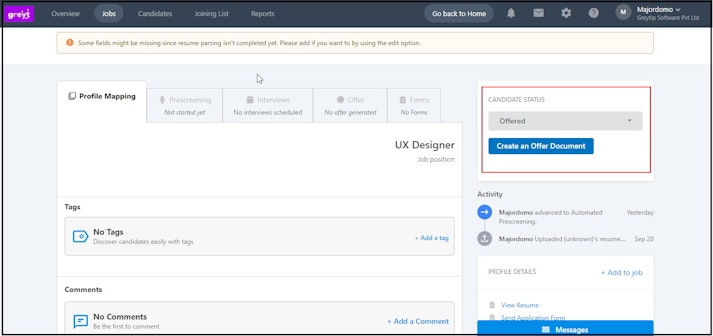
From the Candidate Status dropdown list, select Offered. The Create an Offer Document button appears.
Click the Create an Offer Document button. The Create Offer Document pop-up appears.
Under Choose Template, from Select a template from the dropdown, select the required template. You can view the selected template.
Note: To add/change the letter template navigate to Settings > Templates.Click Next. The Fill Details section appears.
Fill in the details such as the Candidate’s Full Name, Job Title, and Joining Date.
Click Preview Document. The Preview Document section opens and displays the document.
Click Generate Document. The Request for Approval section appears.
Under Request for Approvals, select I need Approval/Skip approval as per requirements.
Under Reviewers, add a reviewer and set the priority.
Note: The selected reviewer receives an email notification to approve the document.Under Additional Files to Review, click +Add files to add files for review.
In the Recruiter Notes text box, add notes for the recruiter.
Click Send for Approval. The Set Expiry section appears.
From the Select an expiry date for the offer generated dropdown calendar, select the expiry date.
Click Next. The Upload Signed Document section appears.
Click Upload to browse and upload the document from your computer. You can also choose to skip this action.
Note:
You can view the created offer document under the Offer tab of the candidate’s profile page.
You can upload a signed document after the document is generated.
You can download the offer document created, sign it, upload the signed document, and then send it to the candidate.
You can send a reminder email to the reviewer by clicking Send Reminder.
If the reviewer approves the offer, the status of the offer changes to Approved, and the Send to Candidate button turns Active.
If the reviewer rejects the offer, the status of the offer changes to Rejected. You can view the name of the reviewer who rejected the offer, along with the comments.
The Upload Signed Document button allows you to upload the signed document. If the document is already uploaded and you wish to replace the existing document with a newly signed one then click the Change Signed Document button. This is useful when revising documents and resending them to the candidate, especially during compensation negotiations.
Create custom reference number for an offer letter
As a recruiter or HR admin, you can set up custom reference number formats for offer letters according to region/department/grade/and other employee categories.
To do this, go to Settings > Offer Template > Create a template.
In the New Template section, fill in all the required details such as Template Name, Template Description, and upload a sample template file.
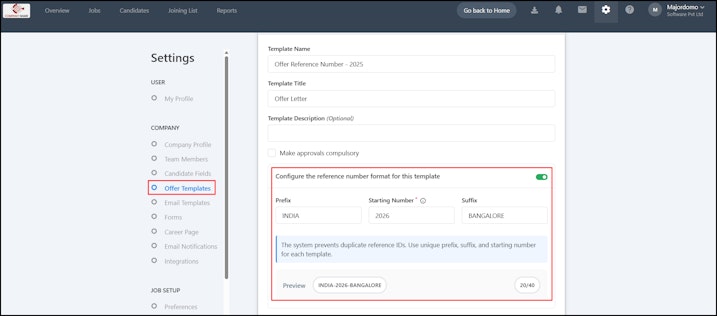
Toggle the Configure the reference number format for this template option to create a custom reference number for the offer letter.
In the Prefix box, enter the prefix. It should be an alphanumeric text field to enter the prefix (Example: “UAE”, “2025”). This is an optional field.
The Starting Number is a mandatory field. If you manually update the starting number, the next offer letter will begin with that number in sequence. For example, if the default sequence is 1001, 1002, 1003, and you change the starting number to 2000, the next offer letters will be 2000, 2001, 2002.
In the Suffix box, enter the suffix relevant to the job. It should be an alphanumeric text field to enter the suffix (Example: “DELHI”). This is an optional field.
Once done, you will be able to preview the custom reference number for the offer letter.
Click the Save button to use this custom reference number for the offer letter for the next offer letter you generate.


Note:
Custom reference numbers will apply only to newly generated offer letters. Existing offer letters will retain their original numbers and cannot be updated.
If the placeholder {{offer.ref_id}} is configured in the offer letter, the system will automatically display the corresponding offer reference number.
In the Offer Template, the system prevents you from creating duplicate reference IDs. To avoid this, use a unique prefix, suffix, and starting number for each template.
If you try to create a duplicate reference ID, the system will show an error: “Offer not created — reference ID already exists. Update the Offer Reference format for this template to proceed.”
Send forms to candidates
As a recruiter, you need to collect documents from the candidate using the Forms. It can be sent to candidates via email through the Messages section in the candidate profile or from the Forms tab within the candidate's profile. Every message sent to a candidate provides the option to Add Attachments or Add Forms.
Create form on greytHR Recruit
At first, you need to create the Form on the greytHR Recruit portal. Go to Settings > Forms > General. The forms in the general category are used for document collection.
Click +New Form, select the Form Type as General, and add a Template Name and Description.
From Approval Actions, you can add approval actions such as Approve and Reject for reviewers for form approval. Multiple actions can be configured from here.
Click + Add Section and fill in the required information, such as Title and Description.
Once the section is created, you can start adding questions related to it. For example, to collect an experience certificate:
Click Add Question and enter the question: Upload your Experience Certificate from your last employer.
Choose File Upload as the answer type from the dropdown.
Once the forms are configured, you can send the form to the candidate.
Send the form to the candidate on greytHR Recruit
Go to the Candidate page and select the required candidate, and click Jobs.
Select the Job card, click Forms > Share Forms.
Click +Add New and select a template for forms.
Once a form is selected, a Preview button appears, allowing you to review the form before sending it.
Specify a Valid Till date if you want to set a deadline for the candidate to complete the form.
Add reviewers for the form if required.
Fill in the other details and click Send Message.
Note: The email sent to the candidate will have a link to upload the documents.
To view the candidates’ documents, go to Forms and click View answers to view the documents uploaded by the candidate.
Please note that the 'View' option supports documents in HTML, DOC, DOCX, PDF, and TXT formats only.
Other related links: