Efficiently Manage Employee Documents on greytHR
Updated in August - 2026 | Subscribe to watch greytHR how-to video
Employee documents refer to any paperwork or digital files that are related to an employee and are required to be stored by the employer for compliance or other reasons. By maintaining accurate and up-to-date employee documents, employers can ensure compliance with applicable laws and regulations, and have a centralized location to store and manage employee information.
The Employee Documents page in the greytHR Admin portal helps you to view, download, and upload employee documents. The page categorizes the employee documents under the Letters, Payslip, Form 16, Company Policies, and Forms tabs. The Company Policies and Forms tabs allows you to preview the policies and forms.
You can also decide which documents to publish to the employees and which to keep confidential.
To view the Employee Documents page, from the greytHR Admin portal, hover over the 9 dots and select Employee > Information > Employee Documents.
You can perform the following actions on the Employee Documents page:
Add employee documents.
Edit employee documents.
Delete employee documents.
Publish/Unpublish employee documents.
Bulk download employee documents
Add employee documents
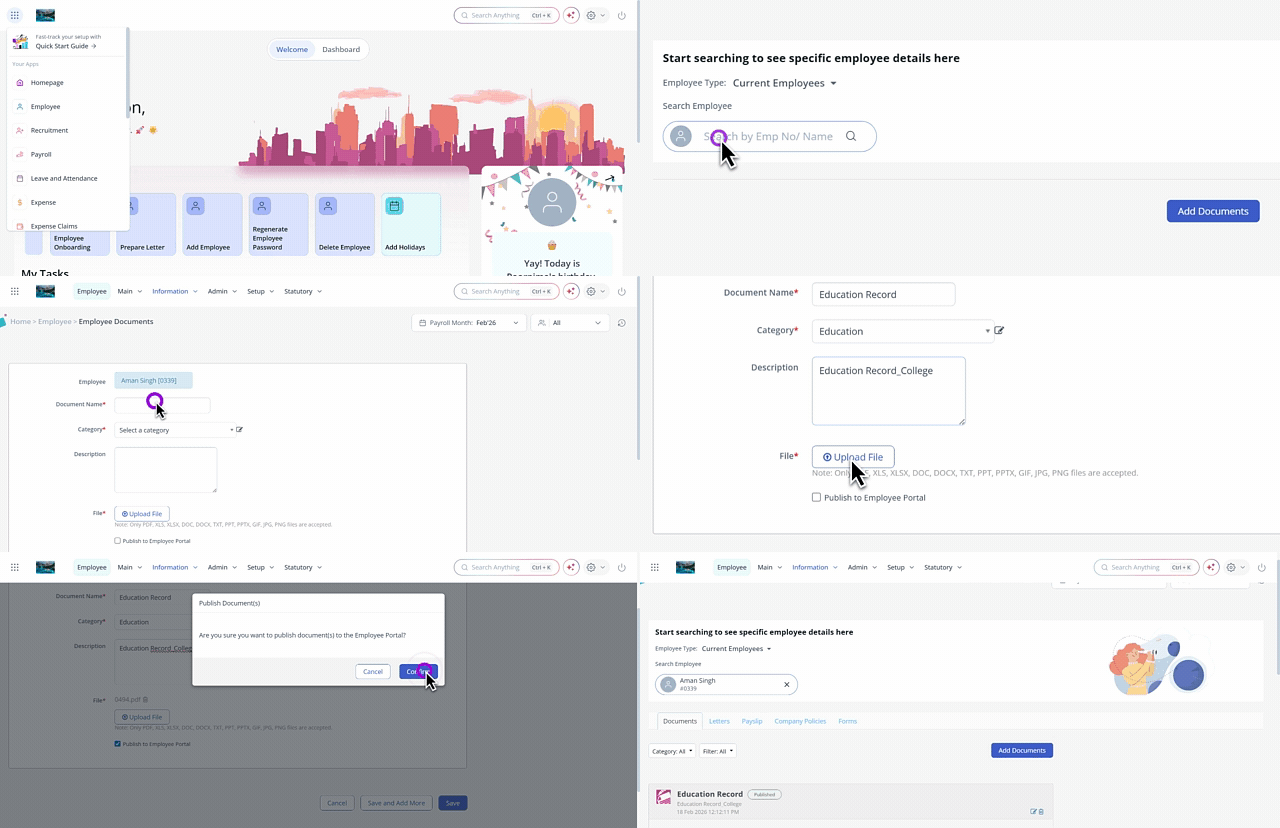
To add a document for an employee, from the greytHR Admin portal, hover over the 9 dots and select Employee > Information > Employee Documents.
On the Employee Documents page, from the Search Employee search box, enter the name or number of the employee for whom you want to add the documents. A list of documents appears.
Click the Add Documents button to add a new document. A form appears.
In the Document Name text box, enter the name of the document.
From the Category dropdown list, select the relevant category.
Note: To add/edit a category, click the Edit icon next to the Category dropdown list. Enter the relevant details. Click Save to add/edit the details.
In the Description field, enter the description, if any.
In the File section, click the Upload File. The dialog box opens.
Browse and select the required file and click Open to upload the selected file.
You can only upload the files in PDF, XLS, XLSX, DOC, DOCX, TXT, PPT, PPTX, GIF, JPG, and PNG formats.
Click the Delete icon against the selected file to delete the selected document.
Select the Publish to Employee Portal checkbox to share documents with the selected employee in his/her ESS portal.
To restrict the employees from viewing the uploaded documents in their ESS portal, uncheck the Publish to Employee Portal checkbox.
Click Submit to complete uploading the selected document. The submitted document details appear on the Employee Document page.
Note:
To add another document in the same form, click Submit & Add Another.
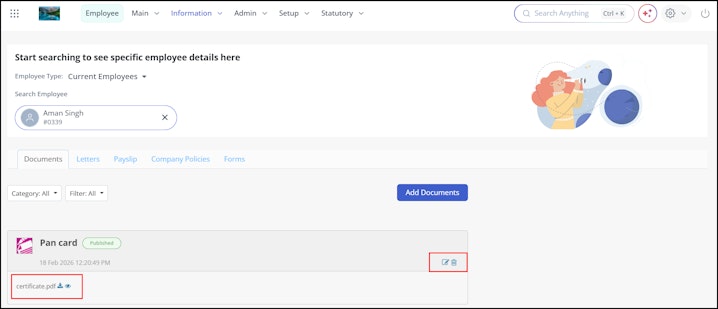
On the Employee Documents page, you can use the Edit and Delete icons to edit/delete the documents as needed.
You can also use the Download and View options to view and download the employee's documents.


Publish/Unpublish employee documents
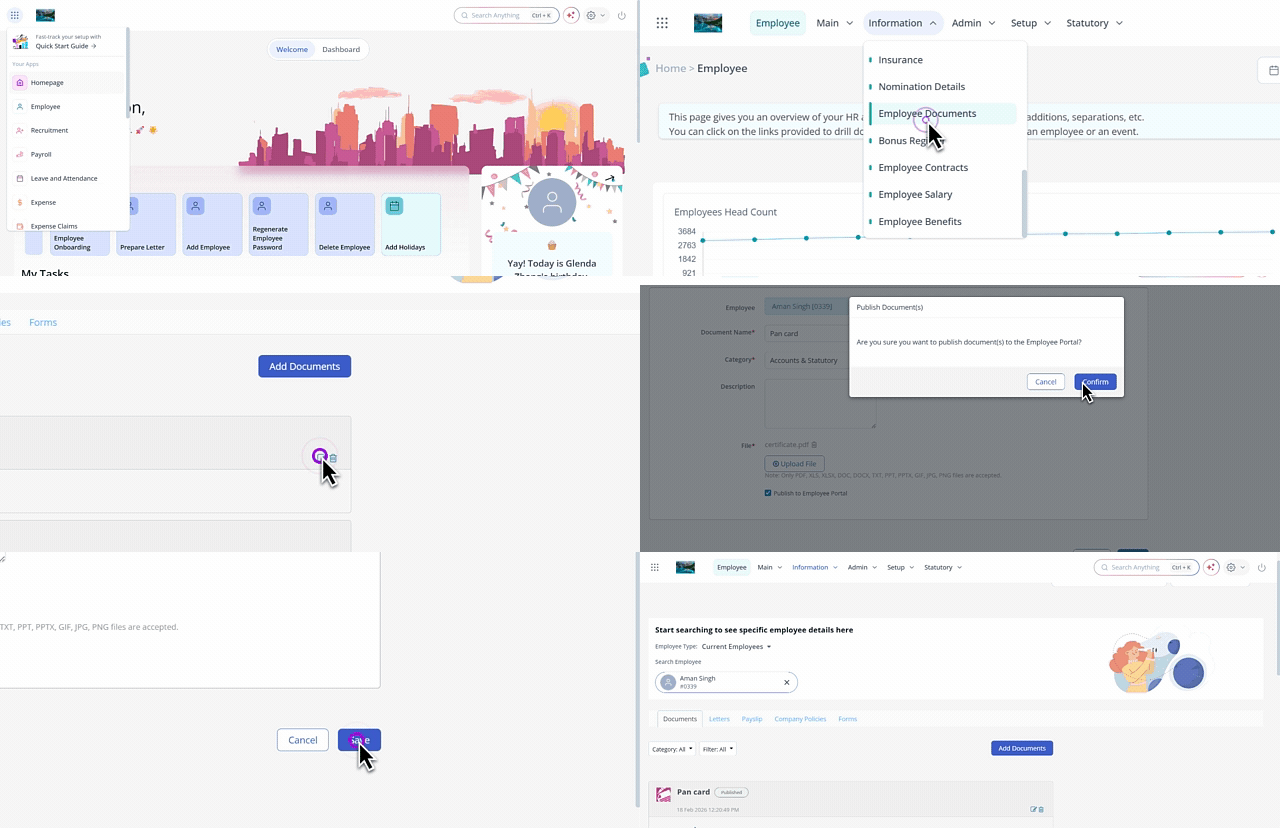
To unpublish the employee documents, from the greytHR Admin portal, hover over the 9 dots and select Employee > Information > Employee Documents.
On the Employee Documents page, from the Search Employee search box, enter the name or number of the employee for whom you want to publish/unpublish the documents. A list of documents appears.
Select the required document card.
Click the Edit icon on the selected document card. The form appears.
Select/deselect the Publish to Employee Portal checkbox to publish/unpublish the documents in the selected employee’s ESS portal.
Click Submit to publish/unpublish the document.
Bulk download employee documents
The Bulk Download feature allows you to download employee documents in bulk for a single employee or multiple employees, reducing the need to download documents individually. For this to apply you must enable the option from the Settings page.
Enable bulk document download access
To enable access to Bulk Document Download, from the greytHR Admin portal, go to the Settings icon > User Administration > User > User Roles.
Select the required user role card and click the Edit icon.
From the Category dropdown list, select Document Center.
In the Search search box, enter Bulk Document Download. A table appears and displays the feature.
Select the Read Access and Write Access checkboxes available next to Bulk Document Download feature.
Click Save.
Download documents for a single employee
To download documents for a single employee, from the greytHR Admin portal, hover over the 9 dots and go to Employee > Information > Employee Documents.


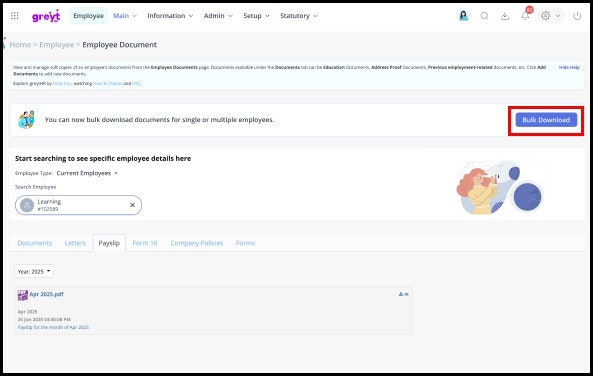
Click Bulk Download.
Under download for, select Single Employee.
Search and select the required employee from the search bar.
Select the documents you want to download. You can click the eye icon to preview documents.
Note: If the selected employee has a profile photo, Profile Photos appears as an additional category alongside the other document types. If the employee doesn't have a profile photo, this category isn't shown.
Click on Bulk Download. A pop - up appears.
Click Proceed.
Note: Once the download is completed, the documents are available as a ZIP file for download.
Download documents for multiple employees
To download documents for a multiple employees, from the greytHR Admin portal, hover over the 9 dots and go to Employee > Information > Employee Documents.
Click on Bulk Download.
Select Multiple Employees.
Filter employees (Current / Resigned / All Employees).
Select one or more document types:
Documents
Letters
Payslips
Form 16
Company Policies
Forms
Profile Photos
Note: When Profile Photos is selected, the employee table shows a list of all the employees who have their profile pictures. Clicking Select All picks all the employees in the list . Before the download starts, a confirmation message shows the number of photos available to download.
Select employees individually or use Select All. You must select a minimum of two employees to proceed.
Click on Bulk Download. A pop-up appears.Click Proceed.
Download Center
Once you initiate a bulk document download, the process runs in the background and can be tracked from the Download Center.
A Download icon appears in the toolbar showing the number of active downloads.
Click the icon to view progress, including file size, time remaining, and any failures.
Once the ZIP file is ready, you can download it directly to your system from the Download Center.
If the download fails, the status will be shown as Download failed with an appropriate error message.
Note:
Downloaded files are available in the Download Center for 24 hours. After downloading to your system, you can access them anytime. Files not downloaded within 24 hours are automatically removed.
Related Article: