Manage Employee Separation Details in greytHR
Updated in February - 2026 | Subscribe to watch greytHR how-to video
Accurately completing an employee’s separation process keeps records updated, ensures legal compliance, and reduces disputes by capturing key exit details. Separation data also helps organizations analyze turnover trends, improve retention strategies, and make better hiring and workforce planning decisions.
The Separation page in the greytHR Admin portal helps you add your employees' separation details when they discontinue their employment from your organization. The page displays the details such as the resignation status, the reason for resignation, the exit interview date, and the notice period of your employees.
To view the Separation page, from the greytHR Admin portal, hover over the 9 dots and select Employee > Information > Separation.
Watch the video on how to add/edit employee's separation details.
You can perform the following actions on the Separation page:
Add employee separation details.
Add employee exit interview details.
Add employee exit details.
Add employee separation details
To add the separation details of an employee, from the greytHR Admin portal, hover over the 9 dots and select Employee > Information > Separation.
On the Separation page, from the Search Employee search box, enter the employee number or name for whom you want to add the information.
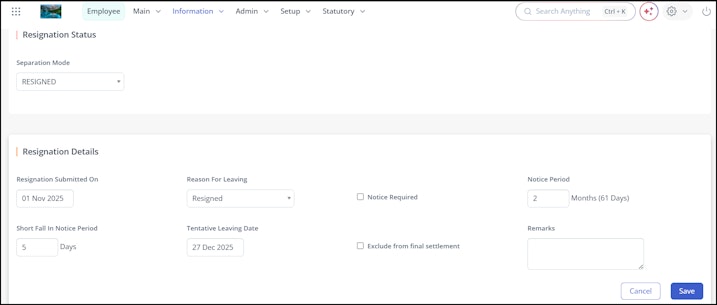
Under the Resignation Status section, from the Separation Mode dropdown list, select the separation mode. Let us take the example of choosing Resigned as the Separation Mode. A list of sections appears.
On the Resignation Details section, click the Edit icon.
From the Resignation Submitted On dropdown calendar, select the date the employee applied for resignation.
From the Reason For Leaving dropdown list, select the employee’s reason for leaving the organization.
Select the Notice Required checkbox to ensure that the employee serves the notice period.
In the Notice Period text box, enter the employee’s notice period.
In the Short Fall In Notice Period text box, enter the number of days excluded from the notice period.
From the Tentative Leaving Date dropdown calendar, select the required date.
Select the Exclude from final settlement checkbox to exclude the employee from the final settlement process. The step is applicable only in a few situations.
In the Remarks text box, enter the remarks, if any.
Click Save to add the separation details of the selected employee.


Note: To delete or remove the updated separation details, click the Edit icon on the Resignation Details section. You can remove the inaccurate details and click Save.
Add employee exit interview details
If an employee resigns from your organization, it is mandatory to fill in the resigned employee’s exit interview details for processing his/her final settlement.
To add the exit interview details of an employee, from the greytHR Admin portal, hover over the 9 dots and select Employee > Information > Separation.
On the Separation page, from the Search Employee search box, enter the employee number or name for whom you want to add the information.
Under the Resignation Status section, from the Separation Mode dropdown list, select the separation mode. Let us take the example of choosing Resigned as the Separation Mode. A list of sections appears.
On the Exit Interview section, click the Edit icon.
From the Interview Date dropdown calendar, enter the required date.
In the Notes text box, enter the notes, if any.
Click Save to add the exit interview details of the selected employee.
Note: To delete/remove the updated exit interview details, click the Edit icon on the Exit Interview section. You can remove the inaccurate details and click Save.
Add employee exit details
You can add the exit details after an employee leaves the organization.
To add the exit details of an employee, from the greytHR Admin portal, hover over the 9 dots and select Employee > Information > Separation.
On the Separation page, from the Search Employee search box, enter the employee number or name for whom you want to add the information.
Under the Resignation Status section, from the Separation Mode dropdown list, select the separation mode. Let us take the example of choosing Resigned as the Separation Mode. A list of sections appears.
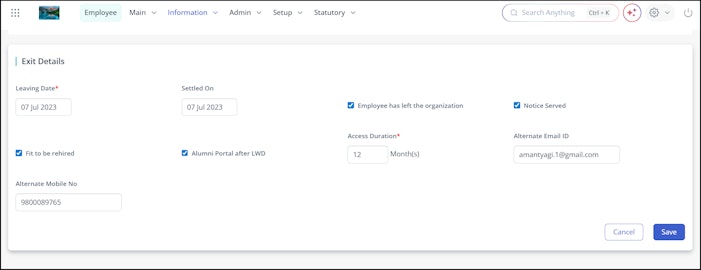
On the Exit Details section, click the Edit icon.
From the Leaving Date dropdown calendar, select the relevant date.
From the Settled On dropdown calendar, select the date on which the full and final settlement is complete.
Select the Employee has left the organization checkbox if the employee has left the organization.
Select the Notice Served checkbox if the employee has completed serving the notice period.
Select the Fit to be rehired checkbox if you would like to rehire the employee in the future.
Select the Employee Alumni Portal after LWD checkbox to enable the access of Alumni Portal services to the selected employee.
From the Access Duration spin box, select the required months if you want to change the default value for the selected employee.
In the Alternate Email ID textbox, enter an alternative email address for the selected employee.
In the Alternate Mobile Number textbox, enter an alternative mobile number.
Click Save to add the exit details of the selected employee.


Note: To delete/remove the updated exit details, click the Edit icon on the Exit Details section. You can remove the inaccurate details and click Save.
Other related links: