Enable Accurate Attendance with greytHR GPS Live Tracking
Updated in July - 2026 | Subscribe to watch greytHR how-to video
Managing attendance for field employees can be challenging due to limited visibility into their actual work locations, travel timelines, and sign-in authenticity. Manual reporting or location-agnostic attendance often leads to inaccuracies, compliance gaps, and difficulty in validating work hours.
GPS Live Tracking in greytHR addresses these challenges by enabling location-based attendance verification, especially for field employees. The feature captures and validates an employee’s location only during active sign-in hours, helping organizations ensure accurate attendance, monitor movement during work hours, and stay compliant with defined attendance policies.
Benefits of GPS Live Tracking in greytHR
Ensures accurate attendance by validating employee location at sign-in, during work, and sign-out.
Provides managers the visibility into employee work timelines, travel paths, and on-site presence.
Provides geo-fence control to prevent false check-ins.
Simplifies compliance and review with detailed travel logs.
Supports field workforce accountability without manual follow-ups.
Enable GPS Live Tracking feature
From the greytHR Admin portal go to Settings > Account Settings > New Features.
From the list of features displayed, select Live Tracking, click the Enable this feature checkbox, and click Confirm.
Next, select Geo Tracking, click the Enable this feature checkbox, and click Confirm.
Note: To enable the features, you need to contact the greytHR Support Team.
Configure access rights for GPS Live Tracking
Once the feature is enabled next important step is to configure access rights for the feature within greytHR.
From the greytHR Admin portal, go to Settings icon > User Administration > User > User Roles.


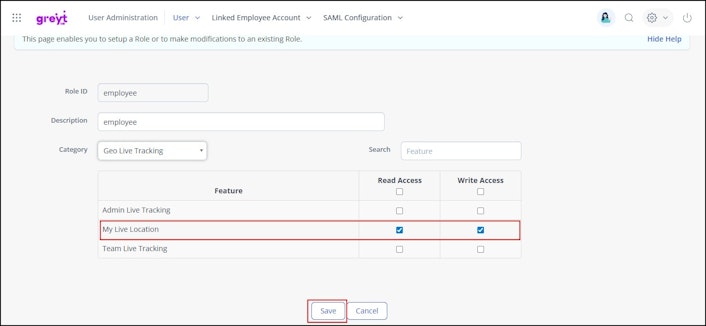
Select the required user role card - employee or manager, and click the Edit icon.
From Category, select Geo Live Tracking. The related features appear.
Select the Read Access and Write Access checkboxes for the feature My Live Tracking if you are enabling it for employees.
Select the Read Access and Write Access checkboxes for the feature Team Live Tracking if you are enabling it for managers,
Click Save.
Enable Live Tracking for GPS-based attendance
For the GPS Live Tracking feature to work, you must configure Live Tracking as swipe-capturing method. To do this, go to Settings > System Settings > Attendance > Attendance Scheme.
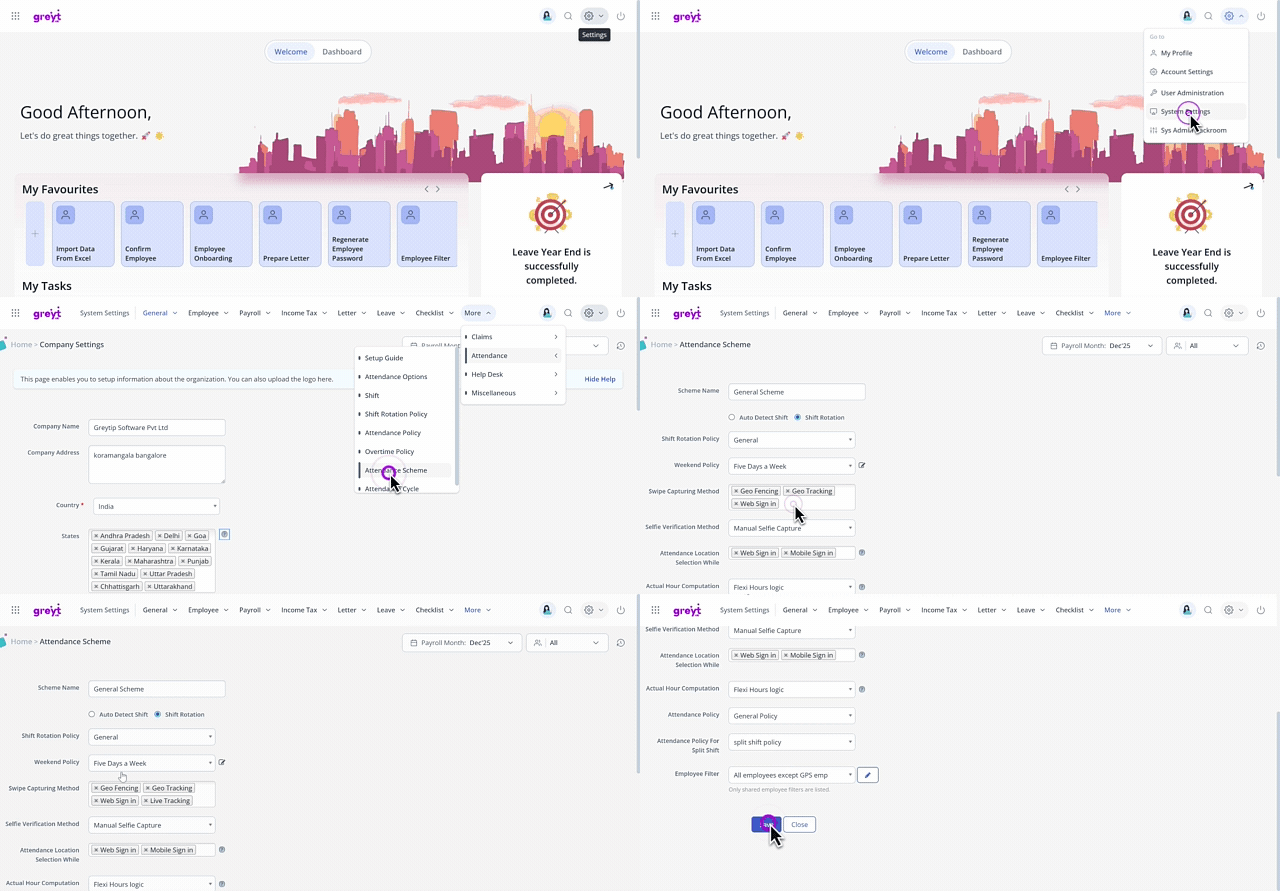
Select the required attendance scheme for which you want to configure the GPS Live Tracking and click the Edit icon.
From the Swipe Capturing Method list, select Live Tracking and Geo Tracking.
Click Save to update the changes.
Note: For the GPS Live Tracking feature to work correctly, ensure that both Live Tracking and Geo Tracking
(Sign-in/Sign-out) are enabled. If either setting is disabled, the feature will not function.
Best practises for using GPS Live Tracking
GPS Live Tracking depends on the device’s GPS and network availability, so minor location differences may occur.
GPS accuracy may be affected in lifts, basements, underground parking areas, large buildings, or places with weak network coverage.
Even when GPS is turned on, location signals may be temporarily unavailable.Location permission is required to capture live tracking data. If permission is denied, GPS Live Tracking will not work.
Battery saver or power optimization settings on the device may restrict GPS tracking.
For best results, GPS, mobile data, and required app permissions should be enabled.
Use one device per user. Using multiple devices or sharing devices can result in incorrect tracking data.
Small variations in distance, travel time, or visits are expected due to GPS limitations.
View GPS Live Tracking reports
Once GPS Live Tracking is configured and employees begin signing in, admins can generate detailed GPS-based attendance reports from the Report Gallery.
Three reports are available under the Attendance category. Only Admins with Read/Write access can view and generate these reports. To configure access rights
From the greytHR Admin portal, go to Settings icon > User Administration > User > User Roles.
Select the admin user role card and click the Edit icon.
From Category, select GPS Live Tracking. The related features appear.
Select the Read Access and Write Access checkboxes for the features GPS Check-In and Check-Out Summary Reports, GPS Daily Summary Report, GPS Event Wise Summary and click Save.
To view the GPS Live Tracking reports, from the greytHR Admin portal, hover over the 9 dots and go to Reports > Report Gallery > All Reports > Attendance.
GPS Daily Summary
This report provides a daily summary of each employee's GPS attendance, including sign-in/sign-out times, work hours, travel time, distance covered, and number of visits.
From the greytHR Admin portal, hover over the 9 dots and go to Reports > Report Gallery > All Reports > Attendance > GPS Daily Summary.
Select a From Date and To Date.
Under Employee, choose All Employees or Selected Employees.
From the Options dropdown, select up to 4 fields to include.
Click Generate and choose Excel (.xls), Excel (.xlsx), or PDF.
Available fields: First Sign In, Last Sign Out, Actual Work Hours, Total Work Hours, GPS Lost Time, Travel Time, Distance Traveled, Number of Visits.
GPS Event Wise Summary
This provides event-level GPS movement data for employees, including event time, location, address, travel time, distance, and remarks.
To generate the report, from the greytHR Admin portal, hover over the 9 dots and go to Reports > Report Gallery > All Reports > Attendance> GPS Event Wise Summary.
Select a From Date and To Date.
Under Employee, choose All Employees or Selected Employees.
From the Options dropdown, select up to 4 fields to include.
Click Generate and choose Excel (.xls), Excel (.xlsx), or PDF.
Available fields: Event Time, Location Name, Address, Travel Time, Distance Traveled, Time, Remarks
GPS Check-In & Check-Out Summary
The check-in and check-out details for each employee, including location, address, timestamps, time spent, and remarks are all available in this report
To generate the report, from the greytHR Admin portal, hover over the 9 dots and go to Reports > Report Gallery > All Reports > Attendance> GPS Check-In & Check-Out Summary.
Select a From Date and To Date.
Under Employee, choose All Employees or Selected Employees.
From the Options dropdown, select up to 4 fields to include.
Click Generate and choose Excel (.xls), Excel (.xlsx), or PDF.
Available fields: Check-In Time, Check-In Location Name, Check-In Address, Check-In Remarks, Check-Out Time, Check-Out Location Name, Check-Out Address, Check-Out Remarks, Time Spent.