Generate Employee Letters with greytHR
Updated in October - 2026 | Subscribe to watch greytHR how-to video
Effective communication is vital in any organization, and official letters, like appointment, confirmation, and address proof, are key to maintaining professionalism. But as teams grow, manually creating and managing these documents becomes time-consuming and error-prone.
greytHR’s Letter module streamlines formal communication by automating the creation and distribution of official letters—helping HR teams save time, minimize manual effort, and ensure consistent tone and formatting.
Benefits of the greytHR Letter module
No more repetitive work: You can create multiple letters at once, saving time.
Faster process: The letter templates have to be set up once, and the same can be used while generating letters
Easy access for employees: Once uploaded, employees can view and download their letters anytime from the ESS portal.
Watch the video to learn how to set up the Letter module in greytHR.
Setting up the Letter module in greytHR
Using the greytHR Letter module involves:
Configure Letter Options and Signatories
Create Letter Templates
Letter Generation
Letter Approval by the Authorised Signatory
Publish Letter
Configure letter options and signatories
Before generating the letter, you need to first create letter options and add authorised signatories.
Create letter options
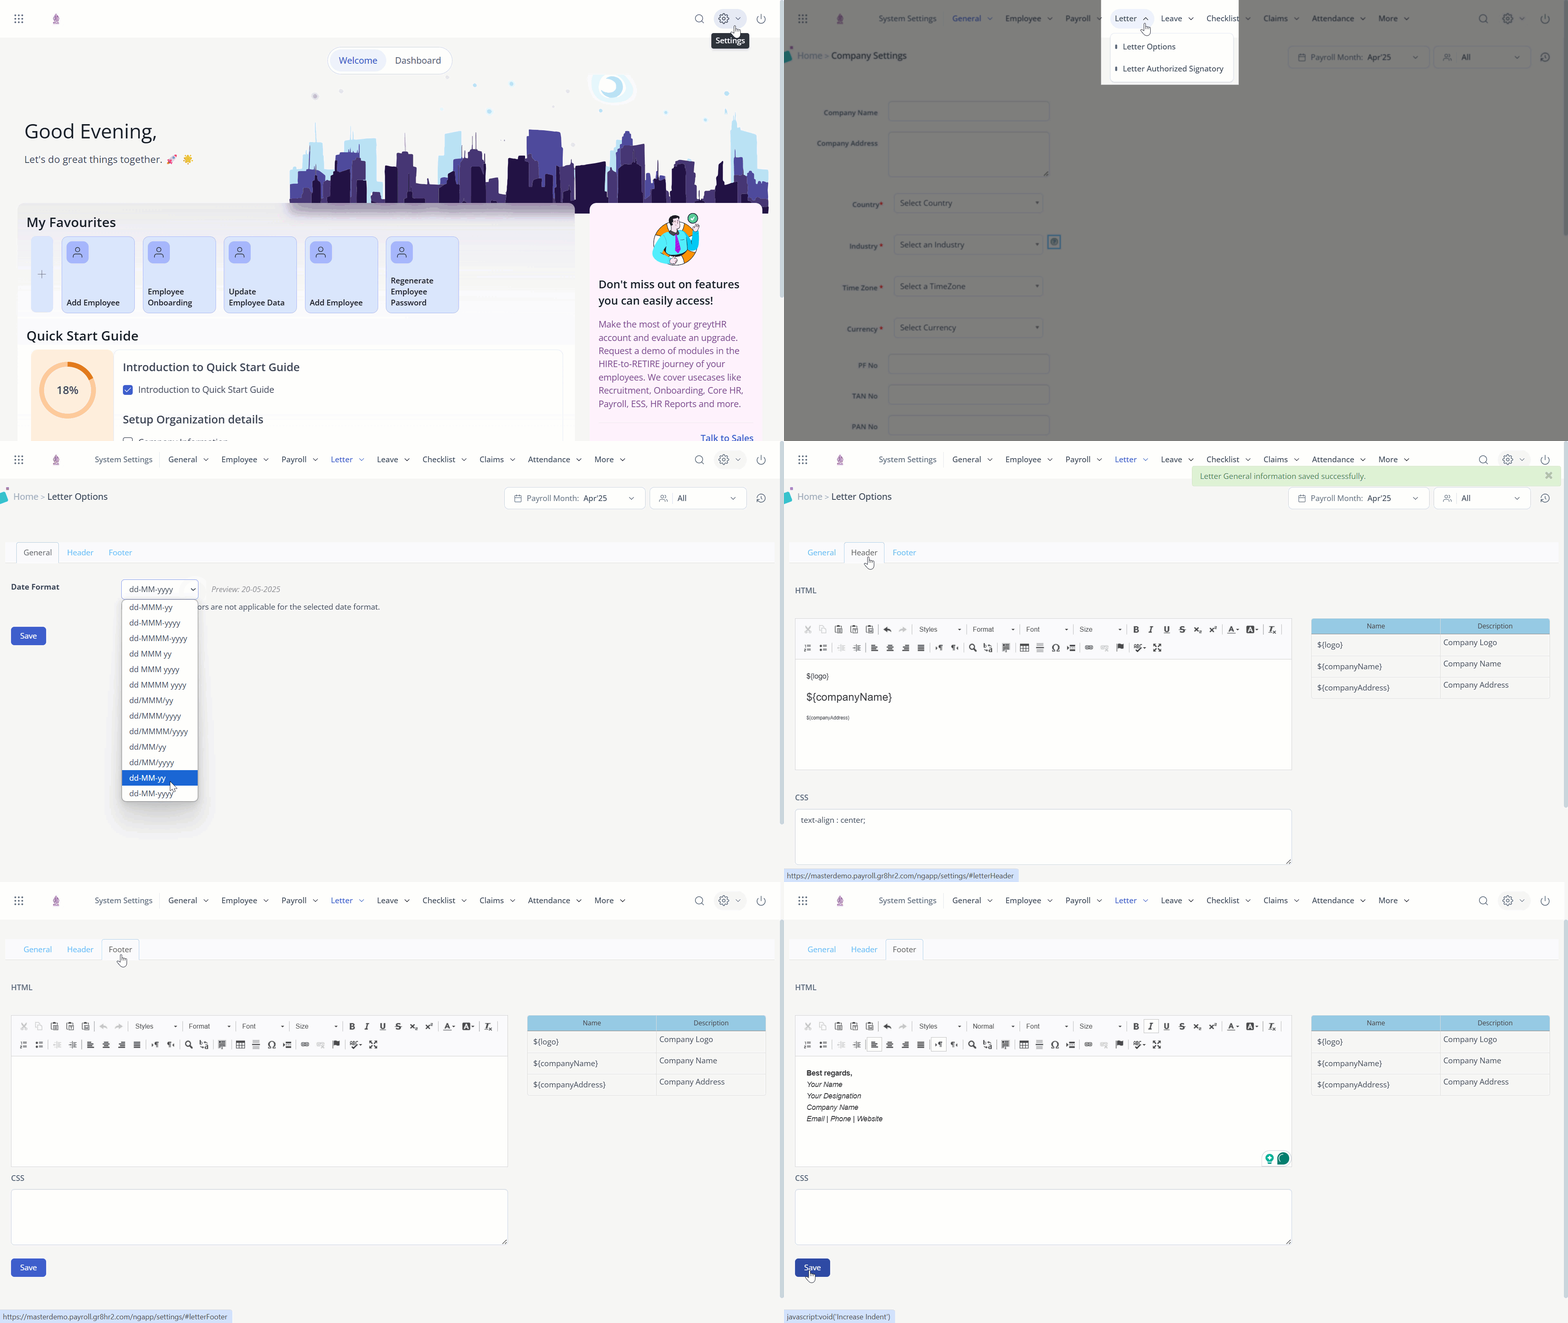
To create a letter template, from your greytHR Admin portal, go to Settings > System Settings > Letter > Letter Options.
Customise elements like date formats, headers, and footers.
Add placeholders for employee-specific details such as name, designation, and salary, and save it.
Add authorised signatures in letters
Authorised signatories are those who can officially sign letters, such as HR managers or the CEO.
Integrating digital signatures into the Letters module ensures documents are authentic, secure, and legally compliant, while keeping the process smooth and easy for an admin.
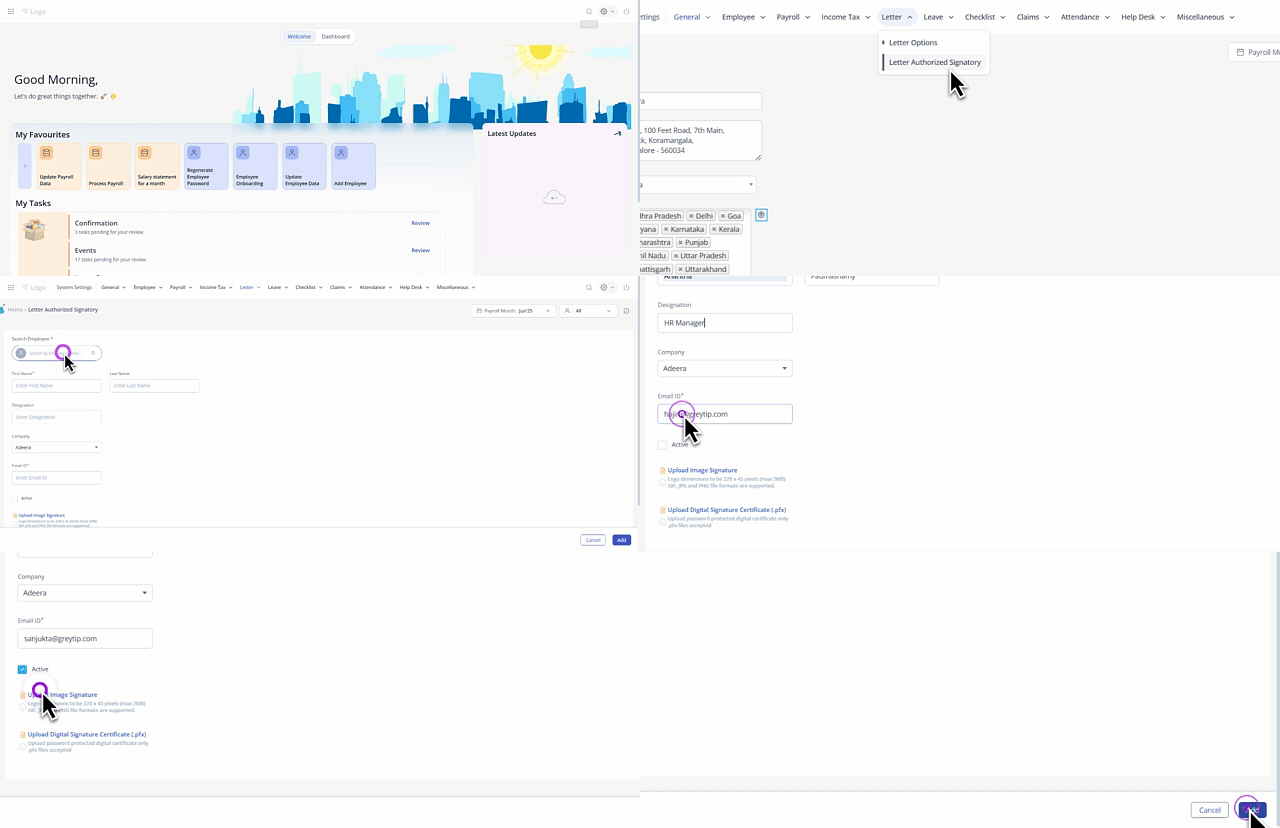
To add the authorised signatories, from the System Settings page, go to Letter > Letter Authorized Signatory.
Click + Add Signatory.
In the Search Employee field, choose the employee who will act as the authorised signatory. The details of the employee get auto-filled, however, you can edit the details if a different employee should handle the mandatory signatory approval.
In the Email ID field, enter the email ID where all the emails with respect to the letter actions should be sent.
Enable the Active checkbox to enable the signature.
Upload the Image Signature from your system.
Upload the Digital Signature Certificate (.pfx) file.
Create a letter template
You can create a letter template based on the organisational requirements.
From the gerytHR Admin portal, hover over the 9 dots and select Employee > Setup > Letter Template.
Under the Letter Template tab, you will be able to view the list of Template Names, if the templates are enabled.
You can also edit or modify the letter template by clicking on the Edit option.
You can delete any letter template by clicking on the delete option. Although the letter template will be removed, the letters generated previously using the template will remain, and you can recreate the template whenever required.
Under the Template Gallery tab, you can view the list of all other available templates.
To add any template from here, click on Preview Template > Add to My Templates > Confirm.
Once added, go to the Letter Template tab and use the search field to get the added template.
Click the Edit icon and customize the letter configuration.
If you want to add a new template, click New Letter Template.
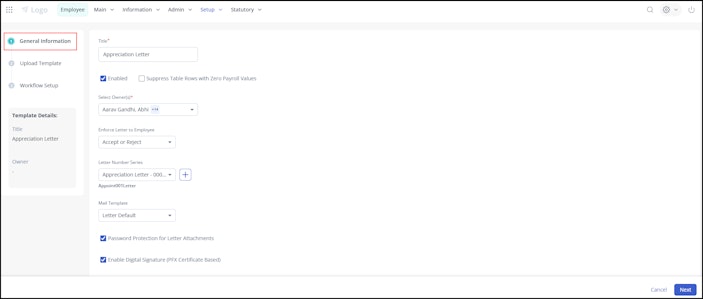
General Information
In the Title field, enter the name of the letter. If you have selected any template, then it will automatically appear.
From the Select Owners list, choose the employee(s) who can access the particular letter template.
From the Enforce Letter to Employee list, select the required option.
In the Letter Number Series field, you can select the series from the drop-down list or create the series using the + icon.
Select the Mail Template as required.
You can enable the Password Protection for Letter Attachments option to secure the letter with a password.
Select the Enable Digital Signature (PFX Certificate Based) checkbox if a digital signature is required for this letter template.
Under Custom Fields, you can double-click any column to edit the field name or value.
You can also enable or disable the Required and Allow Employee Edit checkboxes as needed. If a field is no longer required, you can delete it using the delete option.
Click Next.


Upload Template
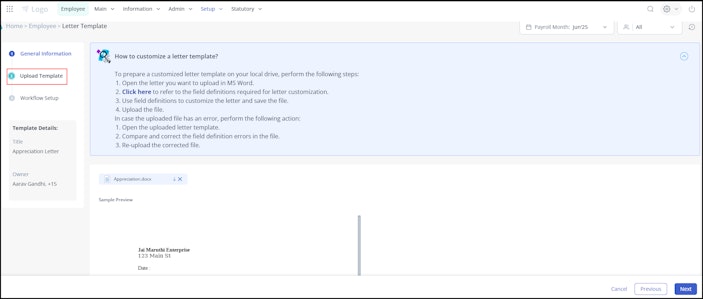
In this step, you will get to view the detailed instructions on how to customize a letter template.
Click the Upload file option to upload the letter template. If the uploaded file has any errors, an error message will appear, and you can click the Download Report option to check the errors
If you add a template from the Template Gallery, the letter’s .odt file will be attached by default. If you need to make changes, download the file, update it as required, and then re-upload it.
Click Next.


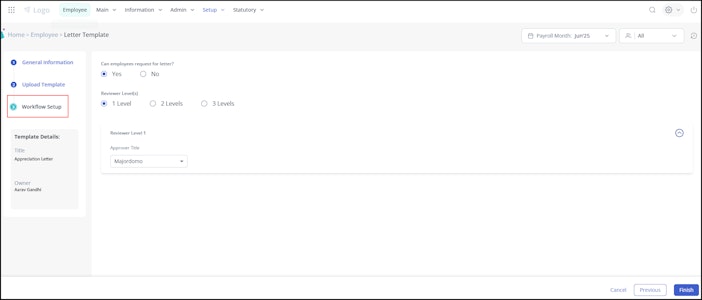
Workflow Setup
Under Workflow Setup, you can choose if employees can request for this particular letter.
Select the reviewer level(s) and choose the approver for each level. You can select up to 3 levels of reviewers.
You can also enable the Auto Forward option if required.
Click Finish to create the letter template.


Letter Generation
To generate a letter, go to Employee > Admin > Generate Letter.
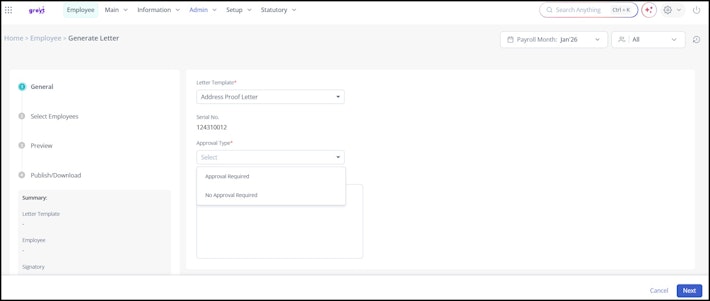
General
Click Prepare Letter. Select the letter template.
From the Approval Type dropdown, select the required option.
Digital Signature using PFX Certificate - Letters are digitally signed using the PFX certificate. Enabled only in demo accounts currently.
Approval Required - The letter is sent to the authorized signatory for approval and signing.
No Approval Required - The letter does not require approval or signing. The authorized signatory can be selected for signature, and the letter can be published to employees directly without any approvals.
Add Remarks if needed and click Next.

Select Employees
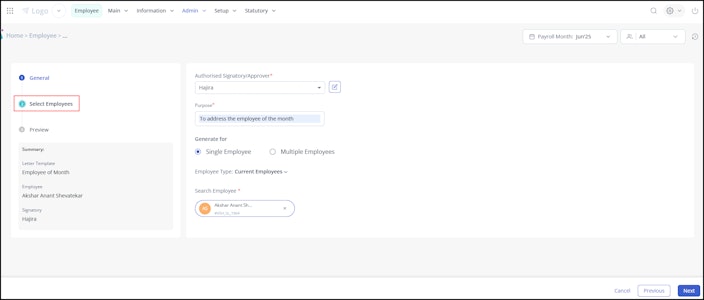
In the Authorised Signatory field, select up to two signatories for the letter.
Neither of the 2 signatories are mandatory, you can select one or both based on the letter's requirement. Signatory 1 must be selected first.
The same signatory cannot be selected in both fields.
Click the edit icon next to either field to navigate to the Authorised Signatories management page.
Enter the purpose of generating the letter in the Purpose field.
You can generate the letter for single/multiple employees.
For multiple employees, select the Employee Filter and add or search the names of the employees.
For a single employee, choose the Employee Type and search for the employee’s name.
Click Next.
Preview
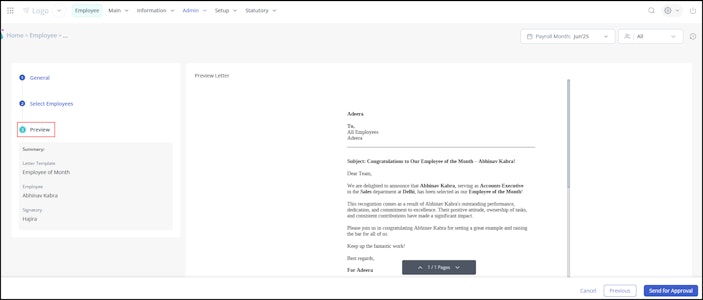
Preview the letter and click Send for Approval.
Once done, the generated letter will move under the In Progress tab in the Generate Letter page.
If you have generated the letter for multiple employees, then you can expand the batch ID to view the details.
You can also choose to send a reminder email to the approver/authorised signatory by clicking on the bell icon.
You can customize the list by using the Columns and Filters as per your preference.


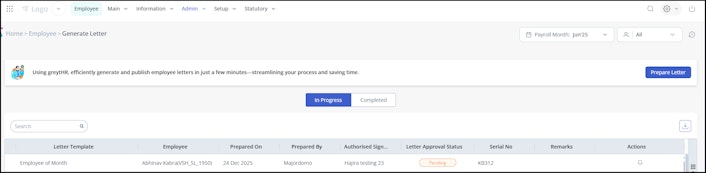
Note: Sample letter preview and download are hidden by default for employees while raising the letter request. Admins can re-enable the preview option by disabling the feature Restrict Sample Letter Preview for New Letter Requests from the User Roles page under Settings.
Letter approval by the authorised signatory
If two signatories are selected, approval follows a sequential order. Signatory 1 must review and approve first. After which it moves to Signatory 2 for approval.
The authorised signatory must log in to the ESS portal.
On the Home page, in the Review widget, they can see a card as Letter Signature Approval.
Alternatively, they can go to To Do > Review > Letter > Letter Signature Approval.
Under the Active tab, all the pending approval requests are displayed. Click View Details.
The letter preview is displayed on the screen.
A timeline appears on the left side of the page showing each signatory's approval status and action taken in sequential order.
If the approval type is mentioned as With PFX Certificate, then the approver needs to have the PFX password that is only shared with the approver to accept the approval request.
To reject the request, the approver must enter the Remarks and confirm.
Click Accept & Sign, enter the PFX Password, and click Confirm.
If the approval type is mentioned as With Image Signature, then the approver just needs to accept/reject the approval request.
The letter will be approved and moved to the Closed tab.
Note:
If a letter is rejected, as an admin, you cannot make any changes to the action taken.
The Signatory Remarks column under the Completed tab displays the rejection reason entered by the authorised signatory for rejected letters.
Publish letters to employees
After the authorised signatory has approved the letter, as an admin, you can release the letters to the employees.
From the greytHR Admin portal, go to Employee > Admin > Generate Letter.
Under the Actions tab, click Release Letter.
Select the checkbox and click the Publish button to publish the letter on the employee’s ESS portal.
If you want the employee to acknowledge the letter, click the Require Employee Acceptance checkbox.
To send a letter via email, select the checkbox for Send as an Email Attachment.
Choose whom you want to send the letter generated via email. You can choose Employee, Manager, and Others as required.
Click Confirm.
Note: From the Completed tab, you can unpublish, delete, download or export the letter.
Info: You can also explore different scenarios and templates for generating letters such as appointment letter, confirmation letter, or experience letter for your employees using the Letter module in greytHR.
Related Articles: