Set Up Employee Review Cycles in greytHR
Updated in June - 2026 | Subscribe to watch greytHR how-to video
A review cycle is an organization's evaluation period set up for employees. Review cycles are like regular check-ins to see how employees are performing. The cycle defines the review process by assigning assessors, timelines, and performance categories for specific employee groups. This helps managers give feedback, track progress, and set new goals.
As an admin, you can manage and control the activities that the employees, assessors, and admins can perform for the Reviews feature from the User Roles page.
To configure access rights for the PMS-Reviews feature from the greytHR Admin portal, click the Settings icon > User Administration > User > User Roles.


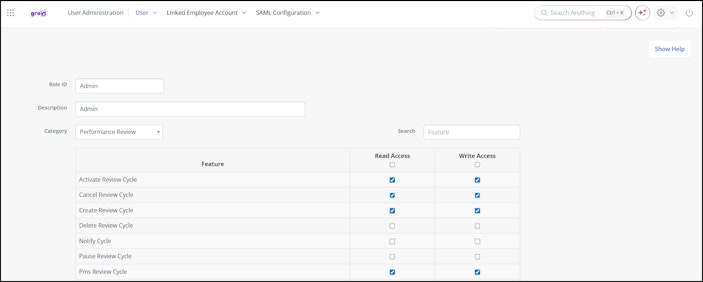
Select the required user role card and click the Edit icon.
From the Category dropdown list, select Performance Review.
In the Search search box, enter Review. The table displays all the related features.
Enable the Read Access and Write Access checkboxes for features such as Activate Review Cycle, Create Review Cycle, PMS Review Cycle, Review Statistics, and View Review Cycle and click Save.
Create a review cycle
To create the review cycle, from the greytHR Admin portal, hover over the 9 dots and select Performance Management > Reviews > Create Cycle.



Let us now set up each stage of the review cycle.
Add cycle details
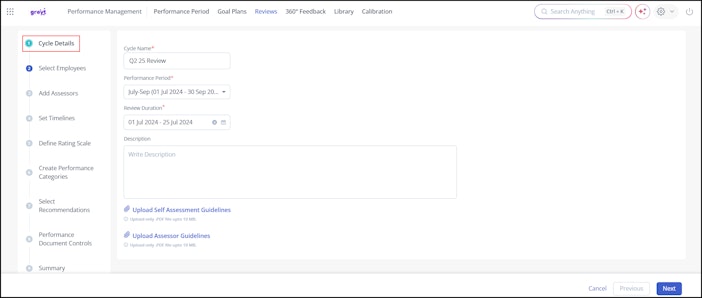
To start setting up the review cycle, as a first step, add the cycle details such as Cycle Name, Performance Period, Review Duration, Description, and attach guidelines for employees, assessors, or reviewers.
Note: The Review Duration must fall within the selected Performance Period.
The Review Start Date must be on or after the start of the Performance Period.
The Review End Date must be on or before the end of the Performance Period.
Example: If the Performance Period is from 1st July to 30th September, the Review Duration can be 1st July to 31st August, but not beyond 30th September.


Select employees
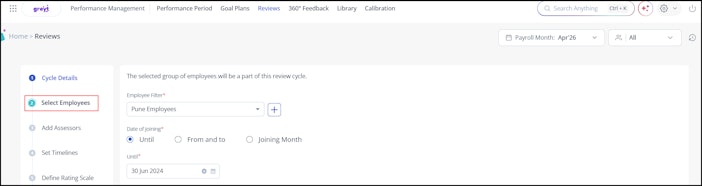
Under this section, you must select the employees who are enrolled for the selected goal plan. You can also add a new set of employees by clicking +. You can only view, manage, and create reviews for employees included in your assigned employee shortlist.


Note:
The Until option allows you to select a date that includes all employees up to that selected date.
The From and To option allows you to choose a date range to include employees within that specific period.
Add Assessors
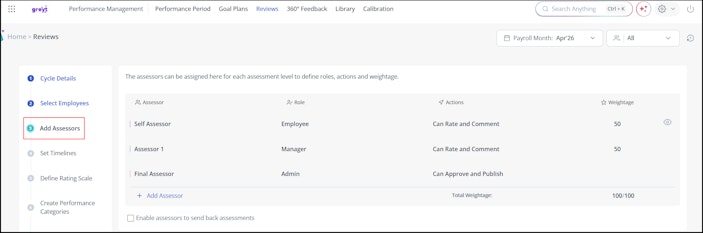
You must add assessors to evaluate employees' performances. By default, three levels of assessors are set. You can also choose to add more.


Here are the key points to keep in mind while setting up the assessors section:
The Self Assessor is the employee by default, however, you have the option to disable the Self Assessment if required. When self-assessment is disabled,
The review process will start with Assessor 1.
The self-assessment stage is automatically marked as Not Applicable (N/A) with a 0 weightage.
The employee will not see the review record in their ESS portal.
Once the review policy is activated, this setting cannot be modified.
For Assessor 1, you can choose the role, actions, and set the weightage as needed.
Use the + Add Assessor option to add more assessors based on your company policy.
For each assessor, you can choose actions Can Rate and Comment or Can Override. When you choose the override option, it replaces the ratings and comments of the previous assessor.
For the Final Assessor, you can change the role but the Actions are set by default as Can Approve and Publish.
You cannot add weightage for the final assessor.
You must ensure that the weightage values add up to a total of 100.
Assessors with Can Rate and Comment can be assigned weightage. Assessors with Can Override cannot have weightage.
Info: Select the Enable assessors to send back assessment checkbox to allow assessors to return the assessment when sufficient information is not available.
Set Timelines
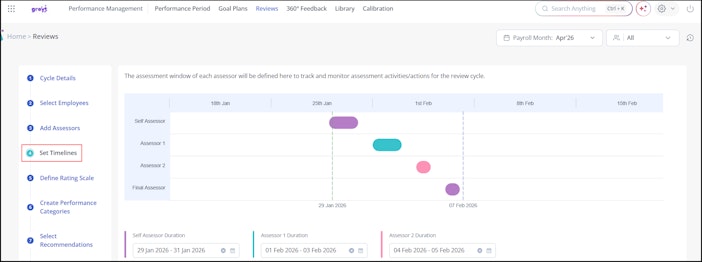
After adding the assessors, set a time frame for them to complete the reviews.
For example, once the review window opens, each assessor takes their turn, one after the other, to complete their review.


Note:
Assessors receive email notifications as reminders informing them about the opening of the assessment window and also alerting them about the closing date of the assessment window.
If an assessor completes the assessment before the set time then the assessment window for the next level of assessor activates before the set time.
Define Rating Scale
Here you must set up the score for the reviews.
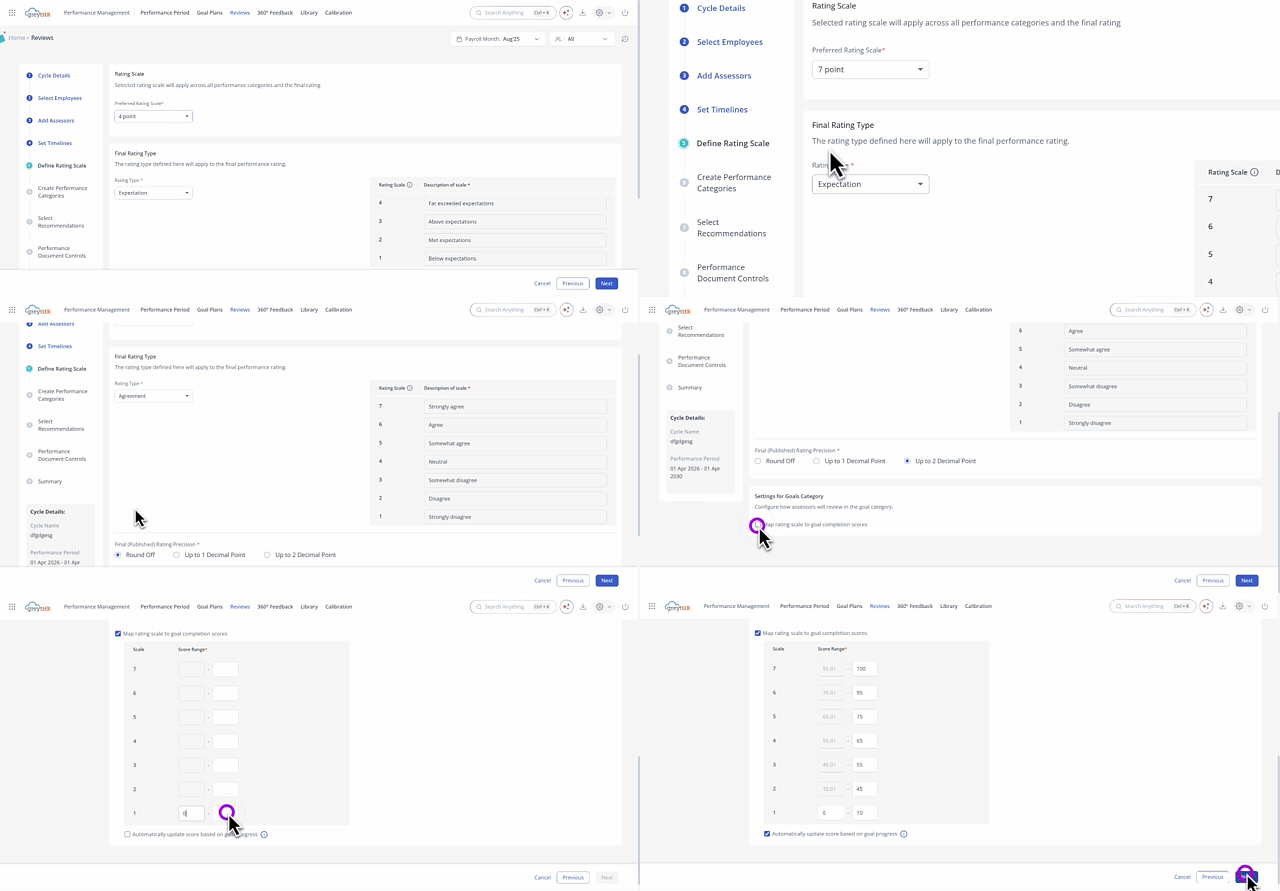
Choose a preferred rating scale from the available options 4-point, 5-point, 7-point, or 10-point. The selected rating scale will apply uniformly across all performance categories and the final rating.
Next, select the Final Rating Type to define how the rating type applies to the final performance rating. You can choose from available scale types.
Decide how you want the final score to show:
A whole number
With one decimal place (like 4.5)
With two decimal places (like 4.55)
Finally, review the description for each score to understand its meaning. If a Custom Likert scale is selected, you can define your own descriptions. For predefined scales, the descriptions are system-defined, not editable
Under Settings for Goals Category, configure how assessors will review the goal category.
Enable the checkbox Map rating scale to goal completion scores to align ratings with goal progress. Once enabled, define the start and end range values for each rating level.
You can also enable Automatically update score based on goal progress, where the system auto-populates the score based on the goal progress. Assessors can modify this score during the assessment if required.
Create Performance Categories
You evaluate an employee's overall performance using the categories you set up here. For example, you might create categories like teamwork, productivity, and communication. The employee’s final performance will be based on how well they score in each of these areas.

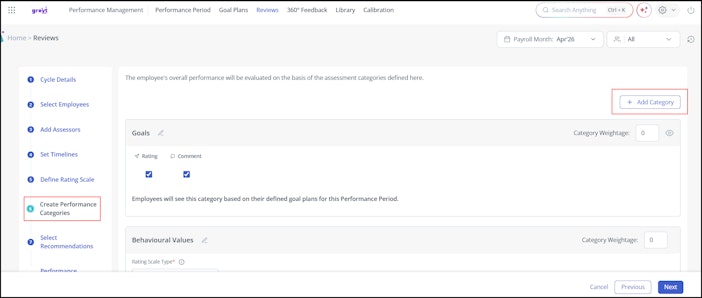
By default, the system includes a Goals category and automatically tracks goal plans based on their timeline and type. You can further customize it as per your requirements.
Select Recommendations
This section allows you to set up recommendations for employee performance reviews. Here, you decide what kind of actions or outcomes can follow an employee’s self-assessment.


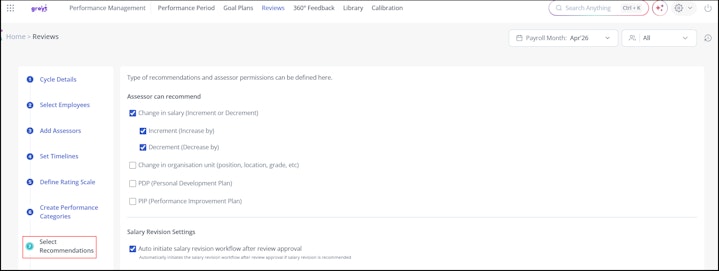
For example, after the self-assessor (the employee) completes their review, the system can recommend actions based on their performance. As an admin, you can set recommendations such as:
Salary Increment for high performers
Change in Designation or Position for those ready to take on new roles
PDP (Performance Development Plan) for employees needing skill-building
PIP (Performance Improvement Plan) for those who need closer guidance
Salary recommendations from reviews can now flow directly into payroll
Under Salary Revision Settings, enable the Auto initiate Salary Revision workflow after review approval to initiate the salary revision workflow automatically after the final assessor has approved the assessment.

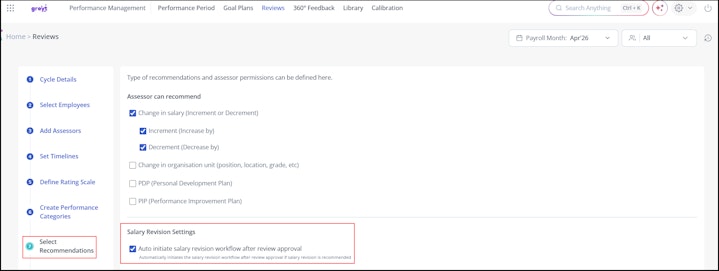
If the auto initiation of the salary revision workflow fails, you can check the failure reason in the Ratings Table under the Ratings & Recommendations tab of a Review. Hover over the ‘Salary revision initiation failed’ message in the ‘Salary Change’ column for an employee to view the reason for failure.
From here, you can also select the employee(s) and click on ‘Initiate Salary Revision’ to re-trigger the salary revision workflow.
If the Auto initiate Salary Revision workflow option is disabled in a Review configuration, you can also manually initiate the salary revision workflow after the review is completed from Performance Management > Reviews.
Open the required review cycle.
Go to the Ratings & Recommendations tab. Under the Ratings Table, select the required employee and click Initiate Salary Revision.
Click Confirm.
Beyond recommendations, you also control the permissions of the assessors:
Assessors, except the first assessor, can add, override, remove, and view salary.
Final assessors can select the effective from date and payout month, and also add arrears.
You can also control the recommendations that can be shown for the employees in their ESS portal.
This setup ensures reviews are fair and lead to meaningful outcomes, with clear roles for each assessor in the process.
Performance Document Controls
Now you must set up what assessors can see in their performance documents.

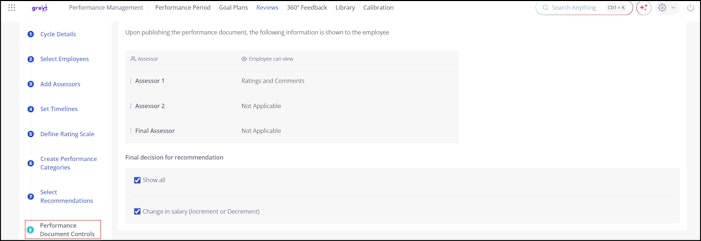
Here is how it works:
For the Self Assessor (the employee), the system automatically shows Ratings and Comments.
For Assessor 1, you can choose what they can view Ratings, Comments, Ratings and Comments, or Not Visible.
If you've added more assessors, you can set their visibility in the same way.
By default, the system sets the Final Assessor to Not Applicable, which means they do not see specific ratings or comments unless you make changes.
This way, you can choose what each assessor sees, so they only get the information they need for their part in the review.
Summary
Once you have set up the review cycle, check its summary to ensure everything is correct.


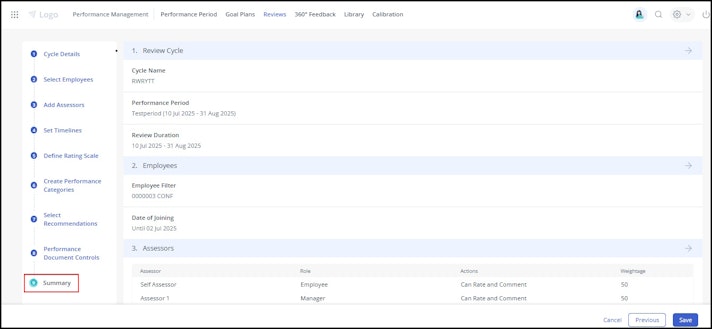
You can click → to make changes to any of the review cycle stages.
When you Save the cycle, it moves to the Draft tab, where you can still make changes. But once you Activate it, you cannot edit the cycle.
The final step is to activate the review cycle to get it started.
Activate the review cycle
After creating the review cycle, you must activate it from the Draft tab.


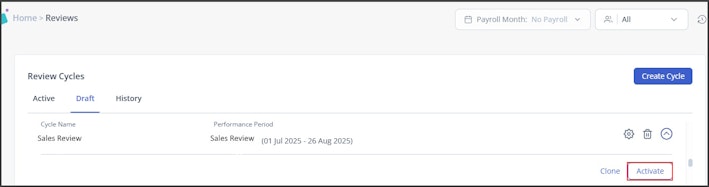
After activating the review cycle, you can manage all related activities, such as pausing, resuming, cloning, or cancelling the review cycles.
Other related links: