Submit and Manage Expenses in greytHR ESS Portal
Updated in May-2026 | Subscribe to watch greytHR how-to video
The redesigned Expense Management System in greytHR brings a more intuitive and unified experience to the ESS portal. This enhancement enables employees and reviewers to efficiently submit, review, and track expenses through a seamless, role-based workflow with improved visibility, automation, and configurability.
To view the Expenses page, log in to your greytHR ESS portal and click Expenses. The Expenses page opens in a new tab.


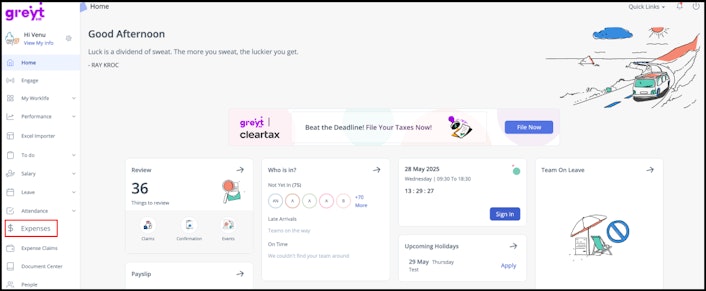
On the Expenses page, you can:
Create a new expense request by:
Adding new bills (expense types)
Adding the bills under Draft to an existing expense request.
Create a new expense request using bills only from Drafts.
Track the submitted expense request status.
Withdraw an expense request.
Create a new expense request by adding new bills
Raising a single expense request allows you to create requests for multiple expenses of various expense categories under one request.
From the greytHR ESS portal, click Expenses.
On the Expenses page, click Add Expenses. The apply form opens.
On the apply form, you can upload or drag and drop the required attachment.
Select the Expense Type. Once selected, the entitlement details as per the policy would appear.
Enter the Bill Number and Bill Date.
From the Bill Amount dropdown, select the currency in which you want to claim the amount. The entitlement would update as per the selected currency. Add a note if needed.
The currency types are displayed based on the policy configuration done by the admin. If it is an amount based expense, then the currency is displayed as configured in the policy.
If it is mileage based expense, then the currency is displayed as configured in the mileage.
Click Submit.
Note: If you select multiple currencies in a single request, a pop-up appears displaying all expense types along with their amounts, along with a note informing you that the payout will be processed in the base currency.Click Confirm. Once done, the expense request would appear under the Pending tab.
Add draft bills to an existing expense request
You can attach bills or receipts to an existing expense request whenever needed.
From the greytHR ESS portal, click Expenses.
On the Expenses page, in the Drafts tab, drag and drop single/multiple bills from the Bills section to the required existing expense request under the Request section.


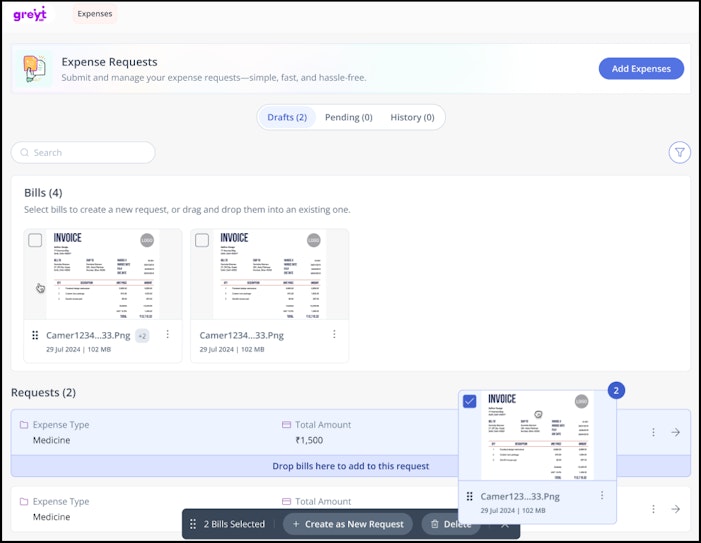
Alternatively, you can click on the → option to view the existing expense request. Once the apply form opens, click + Add > Choose from Drafts on the left panel.
Choose the bill/attachment that you want to add to the existing expense request.
Select the Expense Type. Once selected, the entitlement details as per the policy would appear.
Enter the Bill Number and Bill Date.
From the Bill Amount dropdown, select the currency in which you want to claim the amount. The entitlement would update as per the selected currency. Add a note if needed.
The currency types are displayed based on the policy configuration done by the admin. If it is amount based expense, then the currency is displayed as configured in the policy
If it is mileage based expense, then the currency is displayed as configured in the mileage.
Click Submit.
Note: If you select multiple currencies in a single request, a pop-up appears displaying all expense types along with their amounts, along with a note informing you that the payout will be processed in the base currency.Click Confirm. Once done, the expense request would appear under the Pending tab.
Create a new expense request using bills only from Drafts
Under the Drafts tab, you can view all the bills and attachments that you have uploaded from your greytHR mobile app. You can easily submit an expense request later using the bills from the Drafts tab whenever needed.
To create a new expense request using the bills from the Drafts tab:
From the greytHR ESS portal, click Expenses.
On the Expenses page, under the Drafts tab, click Add Expenses. The apply form opens.
To upload the bills/attachments from Drafts, click + Add and select Choose from Drafts from the left panel.
Choose the required bills/attachments and click Confirm.
Select the Expense Type. Once selected, the entitlement details as per the policy would appear.
Enter the Bill Number and Bill Date.
From the Bill Amount dropdown, select the currency in which you want to claim the amount. The entitlement would update as per the selected currency. Add a note if needed.
The currency types are displayed based on the policy configuration done by the admin. If it is amount based expense, then the currency is displayed as configured in the policy
If it is mileage based expense, then the currency is displayed as configured in the mileage.
Click Submit.
Note: If you select multiple currencies in a single request, a pop-up appears displaying all expense types along with their amounts, along with a note informing you that the payout will be processed in the base currency.Click Confirm.
Alternatively, from the Expenses page, you can create a new expense request:
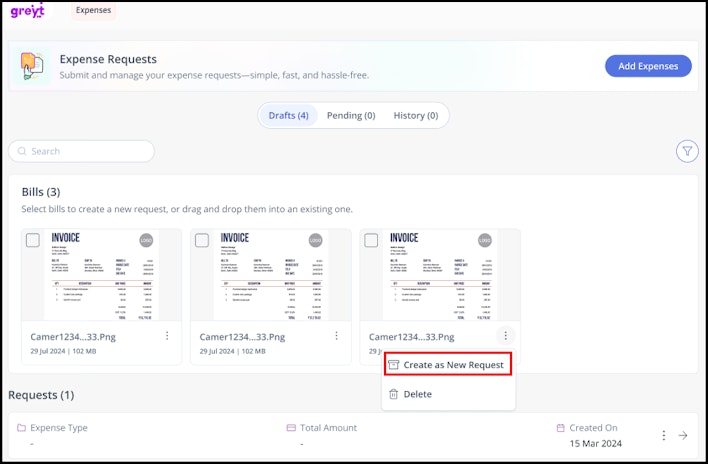
Select a single bill/attachement, click on the three dots > Create as New Request. Fill in the details in the same way in the apply form and submit the details.


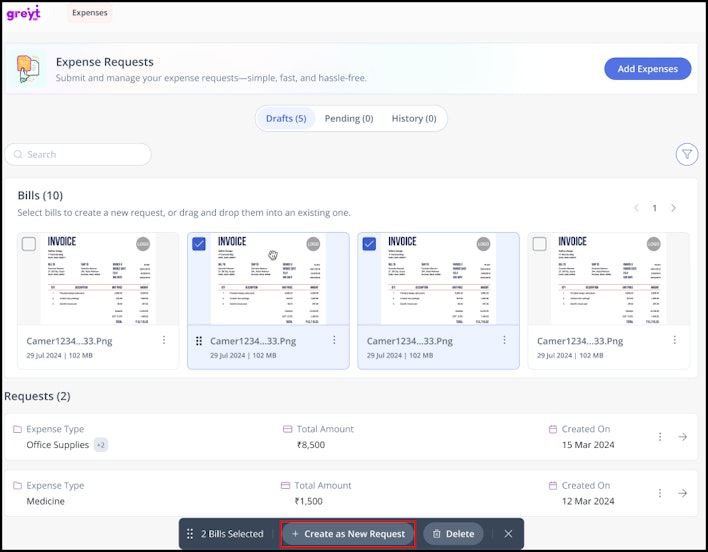
Select multiple bills/attachments and click + Create as New Request.


Track a submitted expense request status
To track the status of an expense request, from the greytHR ESS portal, click Expenses.
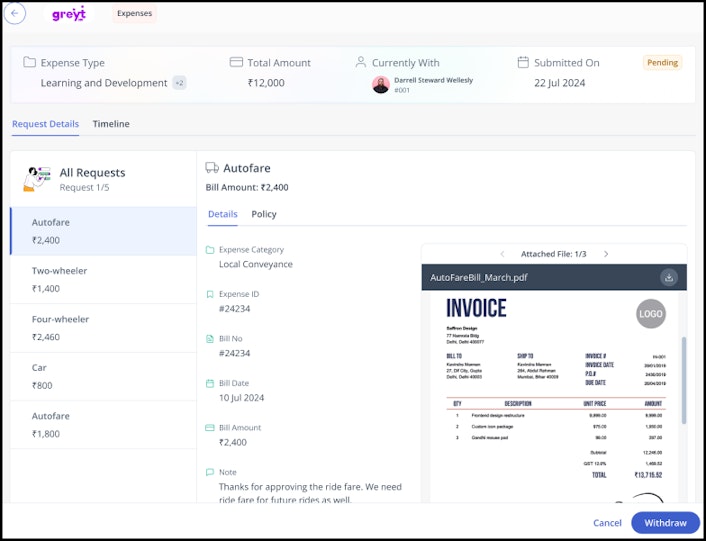
On the Expenses page, select the Pending tab to view the Expense Type, Total Amount, with whom the request is currently with, and the Submitted On date.
To view the details, click on the → button.
Under the Request Details tab, you can see the detailed information about the expense request, such as the Expense Category, Bill No., Bill Date, Overridden Amount, if any. The PDF Viewer helps you to zoom in and out of the attachments, preview the attachment without downloading it, and view multiple attachments.
Under the Timeline tab, you can view the actions taken and the status with respect to each expense item.


Note:
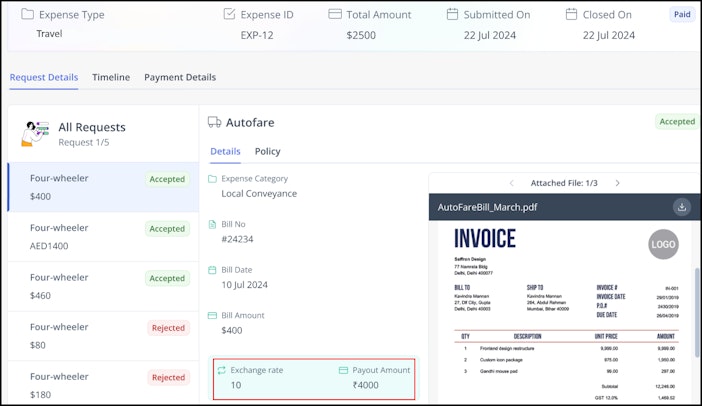
Once the expense request has been accepted and the status is marked as Paid, you can check the exchange rate under the Payment Details tab below the Billed Amount.


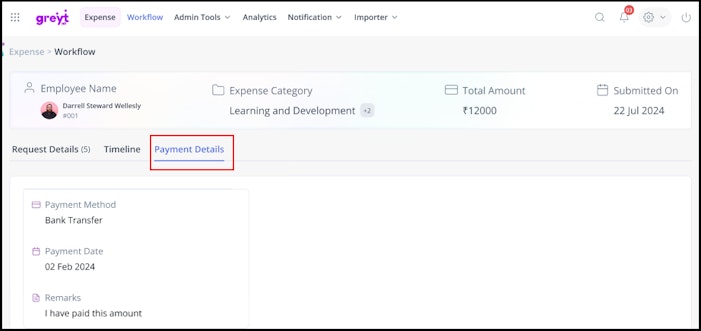
After the amount has been released, under the Payment Details tab, you can view the Payment Method, Payment Date, and Remarks.


Withdraw an expense request
To withdraw an expense request, from the greytHR ESS portal, click Expenses.
On the Expenses page, select the Pending tab.
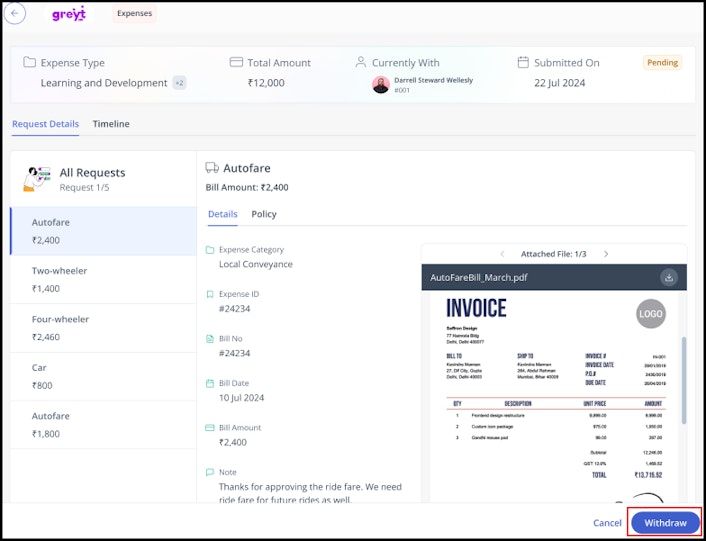
Click on the three dots on the expense request and select Withdraw and click Confirm.
Alternatively, you can open the expense request by clicking on the → button and then select Withdraw > Confirm.
Export your expense request as PDF
Employees can export their expense request as a PDF along with all the attached bills. You can print the Summary Sheet, sign it, and submit it for further processing.
Export a single expense request
From the greytHR ESS portal, click Expenses.
Open the required expense request by clicking the → button.
Click the Download button (hovering shows Export as PDF).
A ZIP file named [Request ID].zip (for example, EXP-23.zip) is downloaded.
Note:
The ZIP file contains a Summary Sheet PDF and all attached bills. The Summary Sheet displays request information in a header section and an expense details table.
The displayed fields may vary depending on whether the request is in the Pending or Completed tab. It also includes Acknowledgement and Signature sections, allowing you to print the document and obtain the required approvals or confirmations, if needed.
If two attachments in the same request share the same file name, greytHR automatically adds a numeric suffix — for example, Receipt.pdf, Receipt-1.pdf, Receipt-2.pdf. If the request has no attachments, the ZIP will contain only the Summary Sheet PDF.